Guide to Linux Desktop - for Windows Power Users

This guide is aimed at Windows power-users like myself looking to use Linux as their daily operating system to completely replace Windows.
Most of it applies to any Linux distro except where specifically stated (I use Ubuntu 22.04, and previously Kubuntu), and should be useful for any user, beginner to advanced.
Advantages of Linux
- Options/freedom. For nerds, the choices are endless. Choose your base distro, spend weeks customizing and tweaking it to infinity. Think of it as building your own OS.
- Constant evolution. Popular open source is vibrant and ever changing. Its always exciting to use software that is actively developed.
- Stays out of your way. No in-your-face monetization. No features-in-disguise nagware to “link your phone and make your experiences consistent across all devices”, “Use Edge Browser, IT’S THE BEST FOR WINDOWS 10“, “Your files are not safe without One-Drive” etc.
- Updates don't suck and genuinely improve your experience. You install them when you want or even choose to never install them, and generally restarts are either not required or optional. They actually fix bugs and add good features. Windows updates in comparison are now forced, nearly always forcing a restart often without permission, tend to re-install crapware (good old Candy Crush), add more spy features (like a 'new' Cortana that can no longer be switched off), and “security updates” that forever band-aid fundamental flaws in the OS architecture and gradually slow the computer over time.
- It's a power-user/nerd paradise.
- Actual TERMINAL. Need I say more?
- OPEN SOURCE. Don't like something? The only option in Windows is complaining to the deaf ears of a faceless corporation. Now you can fork it, change it yourself, and share it.
- Customization. There are dozens of “distros” to choose from some catering to specific styles of user, try each out in a virtual machine and see which suits you best.
- Security. A far more secure architecture than Windows. Most SW is open source and can be audited for spyware and backdoors.
- No drivers to install, most devices "just work". NVIDIA is a notable exception due to their closed model and licensing issues.
- Truly free and ownable. Most proprietary apps you pay for these days are software as a service, which means you DO NOT OWN it. Even though most closed OS are also free or low-cost now, they contain annoying monetizations and crapware built in. However using Open Source is NOT about free-loading! I still donate money to projects I love, and you should too.
- Often incorporates advanced features not yet available in other OS.
- Runs faster. Some distros such as Linux Mint are specifically designed as lightweight, but in general all Linux versions work better than Windows, particularly on old PCs. It is common for the sound of the PC to become quieter due to less CPU usage, and/or the battery life to improve.
- Does its best for the user, not investors. Proprietary software is often deliberately limited due to the fact that they have investors to please and follow a certain business model. They don't need to please users because users are either unaware/afraid of alternatives or the company has other ways to establish a monopoly. Software free of a these forces is truly free to be however the user wants it. Examples of features that are in the best interest the users and not investors:
- Open file formats
- Being able to own a copy of the software and all its data, rather than a subscription
- Absence of dark-patterns, including nag-ware, forcing apps to open on an addiction-feed (exploitative recommendations algorithms), and feature/settings obfuscation (e.g. forced entry of credit-card details for a "free" trial and putting hurdles in front of finding the unsubscribe button).
- Unlimited extensibility
- Ability to enable/disable any feature including tracking
- Community and developers. Proprietary software have tech support departments and we all know how "helpful" they are. Open source typically has no official tech support but instead they have a bright community that you can turn to for help. Developers and users of active/popular software can be happy to help or implement any suggestions you have, and you are invited to help others, which is its own reward. You have the option to support developers with direct donations which feels better than forking over cash for proprietary monopolistic crapware you dont even own. I have never found a problem that I couldnt just google and at least have a few people talking about some solution or work around, no matter how tweaky and obscure. In proprietary land, very often googling advanced issues either gives no results or a message from the tech support saying "sorry we wont be having that feature.. this thread is now locked".
Downsides of Linux
- Too many Options/freedom. For some people this is overwhelming. Simply learning the different options is a huge learning curve.
- Too much Constant evolution. While it is exciting, for some it can be annoying for a tool they use to keep changing and even become stale if the developer stops working on it, then you may need to do some research to switch to an active fork or find the latest replacement.
- New OS to learn. For a decades long Windows power-user there is much to re-learn going into Linux. You instantly go from Windows guru to Linux newbie - this can feel time-consuming at first, and both exciting and frustrating for the average techie. But dont fear, this document is aimed at helping the more advanced users to transition from Windows to Linux with minimal hassle.
- Potentially Unstable software. This can be avoided by sticking to stable releases but sometimes the allure of new features can pull the user down the unstable rabbit hole.
- Application compatibility. This is far better than it was, and there are far more acceptable alternative choices for popular apps. But there are still notable apps that don’t work on Linux, including Adobe, newer versions of MS Office and Skype for Business. Most newer proprietary software tends to be cross platform with Mac and Linux. Many modern games don’t work on Linux, however if you use Steam you will be happy to find many working games there. On the plus side, you will be surprised by the number of non-linux apps that have a reverse-engineered open source version, that is far better than the original and 100% compatible with it.
- Hardware compatibility. Again vastly improved due to generic driver models, But there are a few devices that are not well supported due to manufacturers neglect. Some webcams built into laptops may not work, but there is ongoing work to support them.
- Some aspects may be behind the curve. While Linux is often the first to receive advanced features, on rare occasion it is not if the feature relies-on, or was discovered by, proprietary means (e.g. closed file format support, big-data driven features, lack of open driver support from manufacturers).
- Occasional quirks. Some advanced functionality may require some working around. But again this is a give and take, there will be aspects of Windows which have really bad usability but everyone just got used to them and now they are “standard”.
- Personal tech support harder to come by. This applies more to non-tech-savvy users who would call their kids/techie-friend for PC help, who are far more likely to know about Windows than Linux.
- Can lack sane defaults. Often you see screenshots or videos of people with EPIC Linux setups that work exceptionally well. That is because they spent weeks tweaking and configuring it that way. By default, many tools have massive potential but are let down by not so great defaults, or leaving the configuration entirely up to the user instead of a decent setup out of the box. You will often need to tweak, script, and configure it into a polished diamond of a tool. Although this is improving a lot lately, with distros and forks of powerful tools which are UX focused and have much saner defaults.
A Linux Desktop Journey
I wrote this section to give you an idea of what you may be in for. This is what becoming a Linux power-user was like for me. Each of these stages could be a day or more so be prepared to invest some time depending how far you want to go.
- Install Ubuntu along side dual-boot Windows, Install some apps through package manager... wow this is way better than Windows.
- Actually... that's SO confusing why cant it be more like Windows?
- How do I make this more like Windows/Mac? Hours tweaking to make it work like Windows/Mac
- Researching different distros and figuring out the best one (actually just different DEs for Ubuntu). Every time I try a new one: OMG this is so much better. Actually not really.
- Thinking I am an elite hacker... by copy/pasting terminal commands
- Constantly googling: Best GUI tool for {CLI tool name}?
- Installs awesome theme and Icon set. Thinks: This is THE REASON to use Linux.
- I need a work-around to get dark-mode/some-theme/icon working for this one must-have app I installed that I will probably never will use. EPIC procrastination material.
- Opens a config file in Vim... OMG how do I edit? OMG the text just randomly moved around and lines disappeared. OMG how do I even exit? Closes terminal window, finds nano, ah ok can use this.
- Installing dozens of extensions and tray applications for DE. Just about breaks the whole DE in the process.
- Hours installing work-arounds for tweaky cosmetic stuff that doesnt matter.
- Realises there are multiple ways to install most apps with different tradeoffs. Damnit Snap packages!
- OMG How am I going to run Office/Skype/Adobe? Hours of failed workarounds later > boots back to Windows for a while.
- The next quite weekend available, boots back into Linux: researches FOSS alternatives to Windows-only apps or runs them in a Windows VM. At this point I could spend 99% of my time in Linux.
- Starts to notice other peoples cool looking terminals... Installs a better terminal app with tiling, installs tmux, powerline for bash, cmatrix, fish. Starts posting RICE screenshots.
- Decides to take another look at Vim after seeing it in RICE screenshots... Actually reads a tutorial about it, installs some plugins... and mind is blown. New default text editor.
- At this point I got more comfortable in the terminal than in the GUI > THE TIPPING POINT.
- Constantly googling: Best CLI tool for {GUI tool name}?
- No going back to Windows now.
- Tiling Window Manager as daily driver.
- Installs Arch/Manjaro.
- Writes a book about Linux.
Which Linux Distro to Install?
There are a lot of opinions about distros. Ultimately its your choice. I stick with fairly standard distros as I am willing to take the time to customize it how I want. If you dont and would rather have a specific look and feel out-of-the-box, then I have described a few distros below in this way. This guide is mostly around Ubuntu variants I use, namely Ubuntu Gnome and Kubuntu, but will work for Arch variants if you replace apt commands with pacman. My suggestion is first select either a Ubuntu/Debian based distro (mainstream and stability) or an Arch based distro (better package manager, rolling-release, more cutting edge). If its all too much, go with regular Ubuntu (Gnome) for the best support. Detailed recommendations follow:
Ubuntu/Debian variants:
- Ubuntu (Gnome) The popular Ubuntu standard UX (My current everyday favorite)
- Kubuntu (KDE) Easily customizable, fancy animation, lighter (Previously I used it on an older PC)
- UbuntuDDE (Deepin DE) Uses the DE from Deepin Linux distro, which is rapidly gaining popularity due to having a great out-of-the-box experience
- Ubuntu Budgie A Thoughtful Linux UX
- Zorin OS The Windows 10 UX (Newbie friendly, switch between 6 types of UX, includes Lite version - I installed this on an old PC for my parents to use)
- Elementary OS The Mac OSX UX
- Linux Mint The Windows 7 UX (Most lightweight, several different desktop styles) and user friendly
- POP OS A new very user-friendly distro with optional tiling window manager for effecient workflow for creatives, engineers, and the like.
Arch variants:
Arch linux is a base-distro, taking a different apprach to Ubuntu/Debian, which was started from scratch for advanced users. Advantages include, friendlier HW detection and support (e.g. switching NVIDIA GPUs, and Kernels), a more modern package manager (AUR) and rolling-releases rather than LTS, and the option to control and customise every aspect of your own distro from scratch during installation for absolute minimal bloat.
Arch users are often thought of as the "vegans of the Linux world"... "How do you know if someone is a an Arch user? They will tell you." Make of that what you will.
- Arch Linux Super-custom advanced install, minimalist power-user UX, rolling release, lightweight
- Manjaro Popular user-friendly distro based on Arch linux. Lightweight XFCE is the default experience, but you can also download official Gnome or KDE versions of Manjaro.
Glossary
| CLI | Command Line Interface: a text-only user interface |
| GUI | Graphical User Interface: a visual user interace with windows, buttons, mouse input etc |
| DE | Desktop Environment: a graphical environment for interacting with a Linux-based OS (e.g. Gnome, KDE, XFCE) |
| RICE | Race Inspired Cosmetic Enhancement: Term adopted from superfluous aesthetic customisation to cars made by enthusiasts, in the Linux world refers to elaborate aesthetic customisation to the DE |
| OS | Operating System |
| Distro | A distrubution of Linux, which you can consider to be an OS in its own right, such as Ubuntu or Manjaro. Usually has its own website, includes a repository of thousands of software packages, a default DE and installation program or image |
| FOSS | Free and Open Source Software |
Key Differences between Windows and Linux
- Keyboard shortcuts. Of course you can customize them all in Linux system settings.
- All command/file/folder names in Linux are CASE SENSITIVE vs Windows is NOT.
- Everything in Linux is split up into small libraries/programs created by different many people/companies. This gives you enormous choice and customization power for every tiny detail of your OS. You could be using a specific Kernel 5.4, Gnome as DE (desktop environment), Adwaita as theme, Tilix as terminal, Dolphin for browsing files, FSearch for searching files, Latte-dock as taskbar, Arc as your "start menu", and some other app as an applicaiton switcher. In contrast, Windows and MacOS are clearly intended as a single piece of software where the OS provider builds in these functions tightly (though there are various "hacks" that allow some level of customisation).
- Everything in Linux is mapped to a file, including serial ports, settings, hardware devices, drives, partitions, processes and networks. This makes it very simple for software and scripts to interoperate, particularly through a command line. In Windows these are clearly different types of things with their own unique interfaces.
- Forward slash
/MUST be used as the separator in Linux paths, vs in Windows most of the time both / and \ will work. - In general, a logged in Linux user is clearly delineated, only has user-privileges and can only edit files in their user home directory, and must use special administrator commands to edit anything else system-wide. By default, in Windows, a logged in user is a “fuzzy” definition and is often able to make many system-wide changes, sometimes requiring clicking on an admin popup, sometimes not. This lack of clarity combined with the largest user-base is a key reason Windows is the target of the vast majority of virus and malware attacks.
- Linux Drivers are generally compiled into the kernel (either directly or using modules loaded during runtime), unlike Windows which has separately running drivers.
- If you are a power-user you MUST learn to use the terminal. Think of it as using "text" to communicate to your computer directly - a chat window where you can only talk to one person: your PC. Ultimately it will allow you to extend much further into power-user territory than Windows or Linux GUI allows and fully harness your PC. This might seem scary or time-consuming at first, and you will be compelled to Google for GUI version of this and that, but after some time you will come to see the advantages of terminal and embrace it. There are good reasons to prefer a GUI in some instances, if only to provide comfort. However, after some customisation/beautification and learning, you will feel right at home on the terminal, you will likely end up not wanting to leave it! One suggestion is to keep notes, such as a google doc or markdown file, containing snippets of useful terminal commands. In fact that is how this document started off.
- When everything turns to crap in Windows you hit
Ctrl+Alt+Deland try to troubleshoot running processes. In Linux, if your DE GUI hangs or crashes, the steps will depend on which DE you are using. For Gnome and KDE you can hitCtrl+Alt+F2to bring up a plain text terminal where you can log in and runhtopto examine and kill running processes.
Summary of other equivalents/differences:
| Windows | Linux |
|---|---|
C:\ | / |
C:\Program Files\ | Multiple. See Linux Directory Map below |
C:\Users\mcfly\ | /home/mcfly/ or ~ (if logged in as mcfly) |
| My Documents | /home/mcfly/Documents/ or ~/Documents/ |
| Desktop | /home/mcfly/Desktop/ or ~/Desktop/ |
| .exe file | No specific file extension but executable files must have the execute (+x) file attribute |
| .dll file | .so file (dynamically linked Shared Object) Also .a file (statically linked) |
| .bat file | .sh file |
| COM1 (COM ports) | /dev/ttyUSB0 (To list available ports, type: ls /dev/tty*) |
Add to PATH environment variable: setx path "%path%;c:\directoryPath" | export PATH="$PATH:/path/to/app/bin"To make it persistent for user, add it to: ~/.profileOr make it persistent system-wide, add to /etc/bash.bashrc |
| Administrator | Root or super-user (su) |
| Windows Registry | No equivalent exists (thank God). Application and system config is stored in individual files e.g. in /etc/ folder. A few shared OS settings are also stored in the dconf database (aka GSettings in Ubuntu) located in ~/.config/dconf/user |
| Virtual Memory: Pagefile or swapfile Windows actually uses 3 files: C:\pagefile.sys - Normal pagefileC:\swapfile.sys - For new type AppsC:\hiberfil.sys - Hibernation state | Modern linux uses /swapfile file which you can check using swapon -s. You can easily change its size. Hibernation state is also saved here, so can be 0.5x - 2x RAM size. Recommend: 1.5x RAM |
| Device Manager | Try hwinfo for a GUIOr various commands: lspci, lshw, lsusb |
| Shortcuts: Right click on file/folder to create shortcut. Right click and go to properties to edit. | Create and edit a .desktop file (see section below). Shortcuts are more commonly referred to as Launchers in Linux |
| Symbolic Links (NOT shortcuts): Use mklink in command prompt OR install GUI context-menu tool: Link Shell Extension | Use ln -s command in terminal OR in Gnome, hold Ctrl+Shift while dragging file/folder to destination, or hold Alt while dragging to get context-menu options at destination. |
| Hidden files: Set file attribute flag | Hidden files: any file name beginning with a dot . |
| File systems: NTFS (Default) FAT32 extFAT | File systems: Ext4 (Default) NTFS FAT32 extFAT ZFS |
| File naming limitations (NTFS) Can’t use any of: ? " / \ < > * |: {NULL}Windows GUI prevents naming files starting with dot “.” and various reserved device names e.g. COM1 CON LPT etcFile extensions are almost always present (The only way for Windows GUI to distinguish file type) | File naming limitations (extFAT) Can’t use any of: / {NULL} Some characters have special use and while they can be used, may require escape character ( \) : < > | : & File extensions are optional and sometimes not used (OS can often distinguish file type by first line of content) |
Linux Directory Map
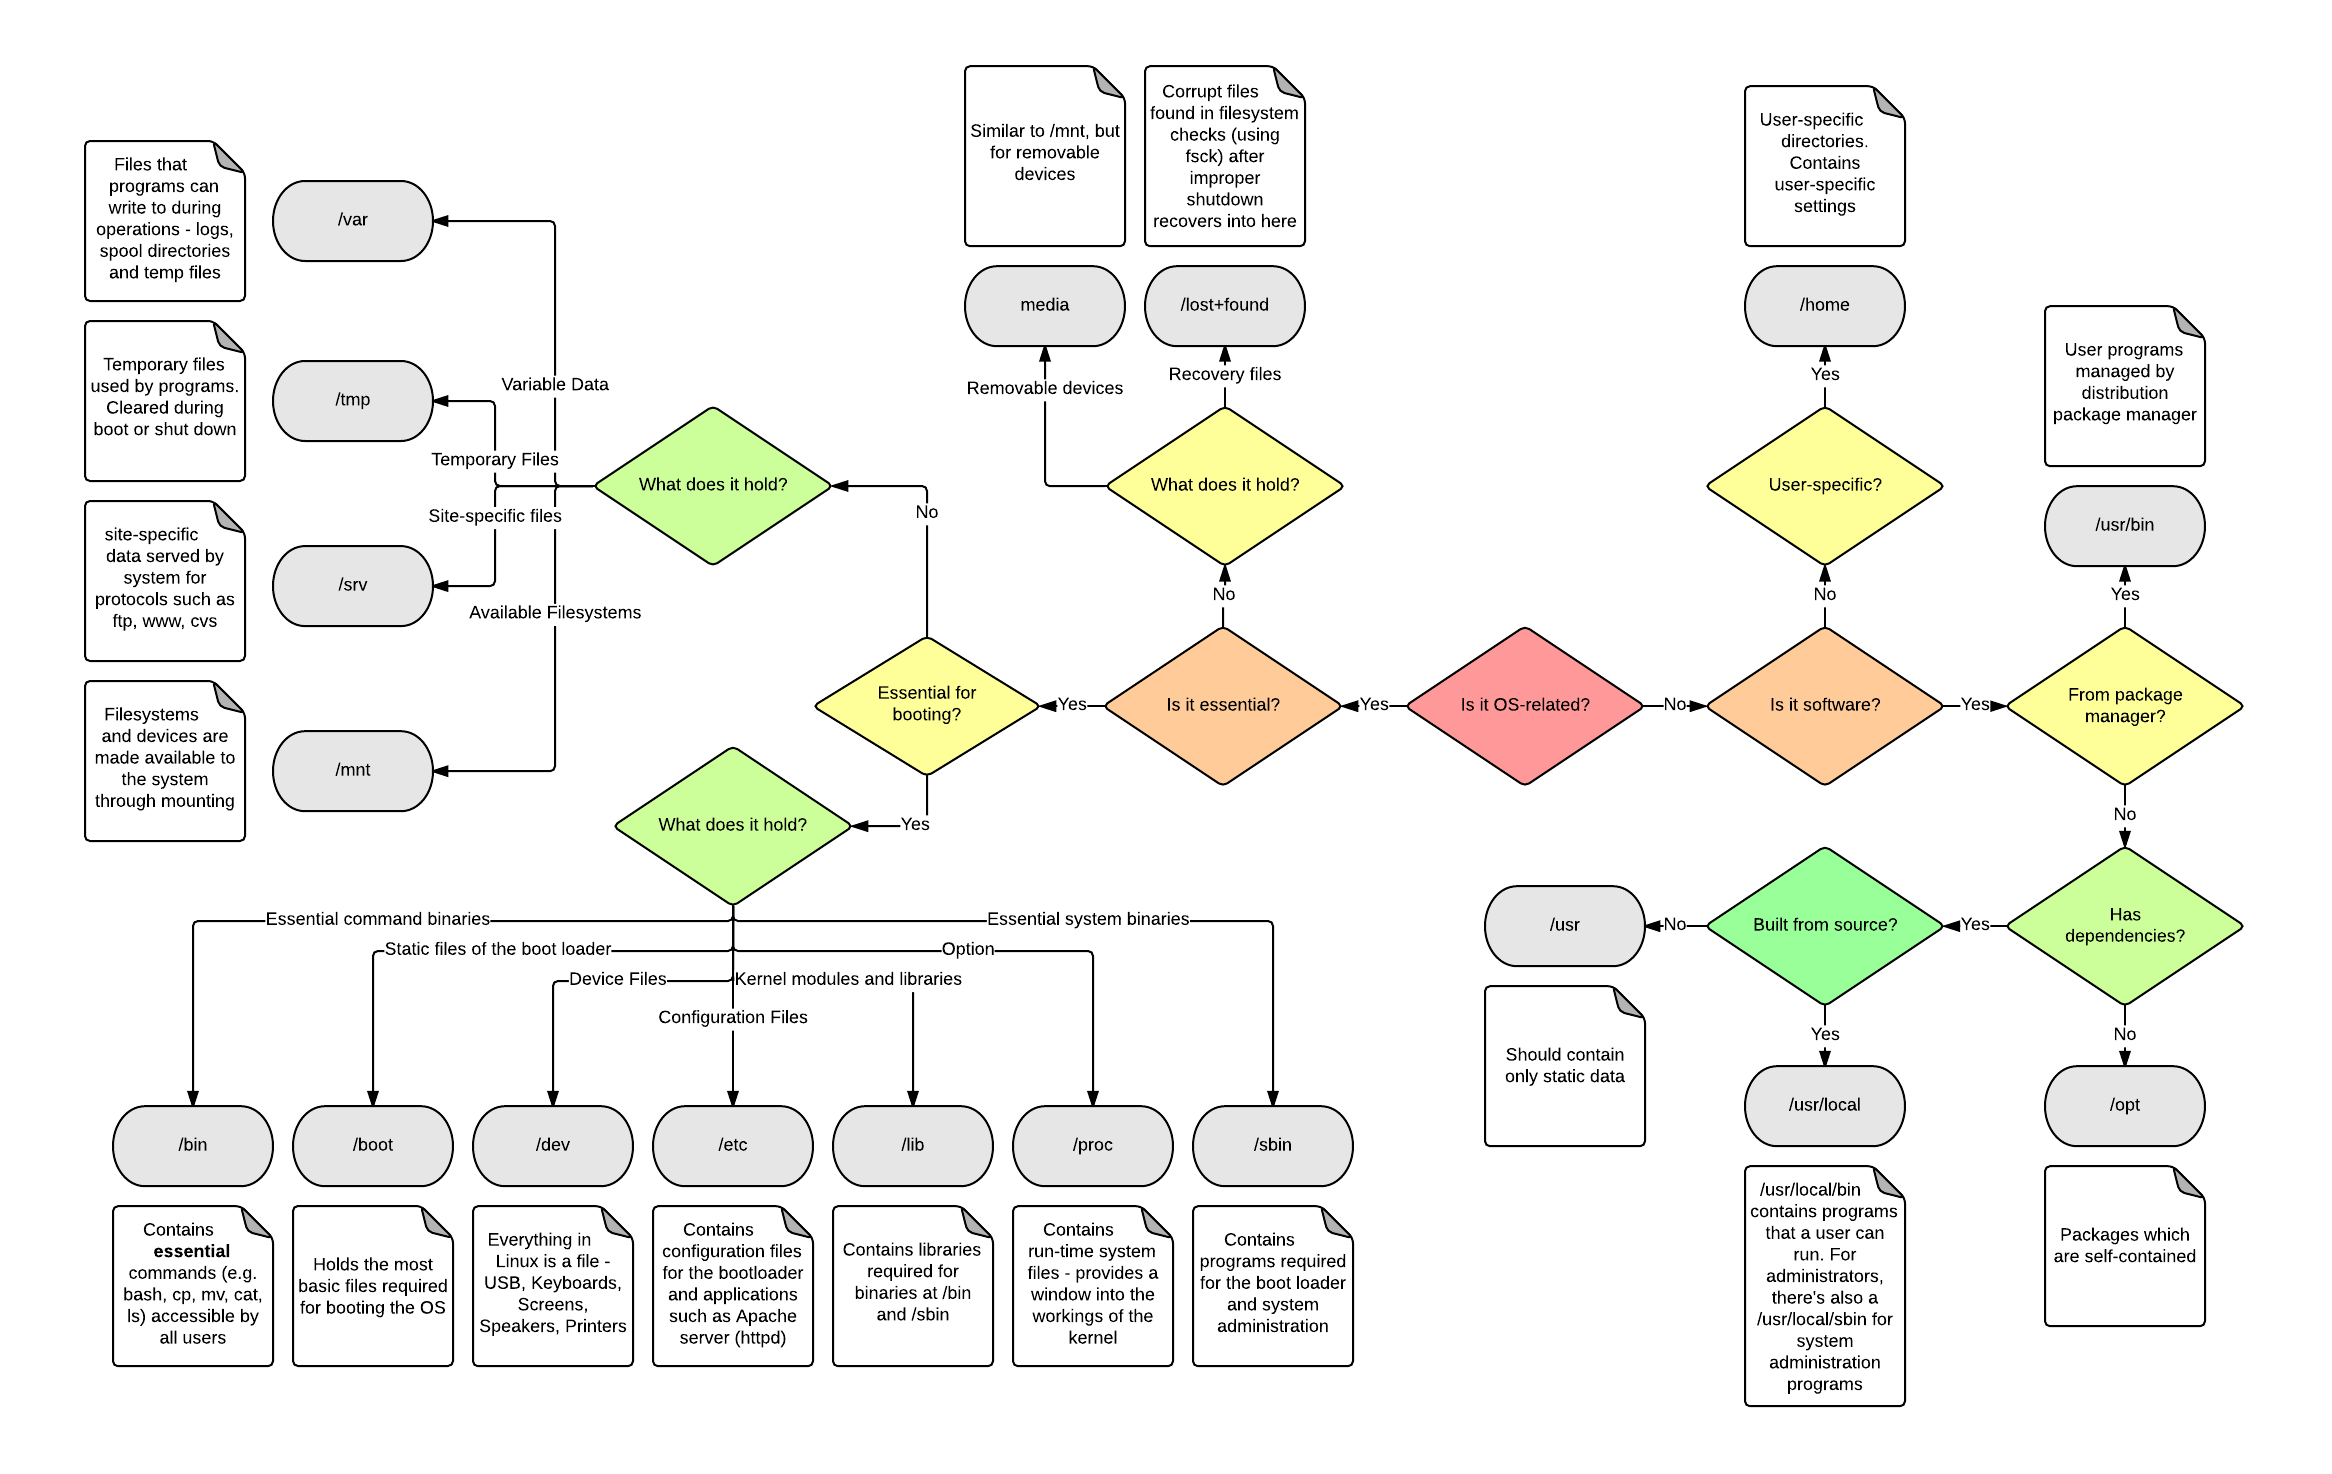
Credit: Daniel Li
More:
File Hierarchy Standard (FHS)
Installing Linux software, different methods pros and cons
On Windows, software is typically installed by running a downloaded .exe or .msi, or by extracting a .zip to a folder, or more recently through the system-managed Windows Store. Dependencies may need to be explicitly installed by the user or are included in the application statically. Historically, Windows software is not well managed by the system, and each app may or may not have its own mechanism for updating, and there is little attention to security or sandboxing, and apps share very few 3rd party libraries compared to Linux. This may improve with Linux-like package systems (Chocolatey) gaining popularity, and Windows Store.
On Linux various install methods have different trade-offs such as automatic updates to latest versions, different degrees of sandboxing, different degrees of bundling dependencies, and so on. Compared with installing Windows apps, which usually involve downloading and running an installer file, Linux apps are usually installed via the Ubuntu Software app, or apt/snap repositories.
FIRST AND FOREMOST, when installing an app, go to its official site and thoroughly read its official install instructions! If there are not any clear instructions, try web search “install {app name} on Ubuntu”, and make sure the instructions are recent and apply to your app and OS version. Having said that, 90% of the time the instructions will just be run: sudo apt install {app name}
The main installation methods are apt and snap. In some cases if the app is new or not common, you may need to add its repository to apt first before installing, and the official install instructions for that app will tell you how to do that.
More detailed list of common software install methods:
User-friendly GUI “App Stores”
-
Ubuntu Software - The default GUI app store in Ubuntu Desktop. It now supports Snap, Flatpak and others if you add their repos.
-
KDE Discover - The default GUI app store in KDE desktop or Kubuntu.
Package/Repository manager
Some of these methods have websites, giving them friendly “App Store” usability, but under the hood they utilize simple terminal commands which you can simply run yourself. My order of preference for installing apps from repositories is below, and the only reason to go to the next method is if I want a newer version than the previous provides or if I something breaks in the package.
-
apt (Aptitude). This is often the first port of call for installing anything on Ubuntu/Debian. The long-standing default for Ubuntu/Debian. Uses PPA repositories to find, update and install software. Install apps using
sudo apt install {app name}. Update all apps usingsudo apt updatethensudo apt upgrade. Apt may also install any additional required packages to run the app. Non-Debian distros will have their own native package manager such aspacmanon Arch and the AUR. The only problem with apt is that the maintainers of the repositories may not always have the latest version of some software. In that case, either add the developers own ppa (see below) or try a different installation method like Flatpak (again below).- Installing a specific version of software using apt:
Show package info:
sudo apt show {package name}Show installed and available versions:sudo apt-cache policy {package name}Install specific version:sudo apt install {package name}={version}e.g.sudo apt install apache2=2.3.35-4ubuntu1 - Adding a new ppa (repository) to apt:
Some applications may not be available in the default apt repositories or they recommend adding their own repository to your system in order to be sure you get the latest version. The easiest way is to run a command e.g.
sudo add-apt-repository ppa:libreoffice/libreoffice-7-0To remove a ppa, see here, or manually remove from either editing/etc/apt/sources.listfile or in the folder/etc/apt/sources.list.d/
- Installing a specific version of software using apt:
Show package info:
-
Flatpak (Restart or log-out/in after initial install of flatpak manager). Gaining popularity as an open alternative to Snap. Uses Flathub repository and many others. It has some of the same advantages and limitations as Snap, including a similar partial solution to theming. Install Flatseal to easily manage permissions and features for apps.
flatpak listto show what is installedflatpak updateto update all Flatpak apps- Globally installed apps are located
/var/lib/flatpak/app. Note: Some apps may not use config files and resources stored in Home, you may need to link them to the installation folder (e.g. themes for Filezilla). - User config files are stored under
~/.var/app/[flatpak app name], rather than the normal locations (~/.config/)
-
Homebrew (previously Linuxbrew). Cross platform (OSX, Linux) and installs apps to the user's home, so you don’t need admin/sudo. This is often a convenient way to install software and packages are normally up to date.
brew install ...brew upgrade
-
Snap (By Canonical - the default for future Ubuntu). Ubuntu graphical app store favors Snap. Applications are sandboxed, include dependencies bundled, and will auto-update in the background once a day. This is similar to the way apps work on Android, iOS, and Windows Store. You may need to manually enable permissions through snap for some apps to work (e.g. USB access, microphone etc). Snap is quickly becoming popular for both desktop and server apps. It is designed to work on any distro. However there are integration limitations due to the sandboxing, such as not obeying desktop environment themes (though possible if the app uses Snap API, or you have a common theme) and DPI scaling. Therefore I avoid using Snaps for complex software with a desktop GUI. It is probably fine for apps that work well in containers with complex and specific dependencies such as server apps and CLI tools.
snap listto show what is installedsudo snap install snap-storeInstalls the snap-store GUI for easily managing installed snaps and changing permissions settings. For Ubuntu Gnome you dont need to install this as the built in Software Center already does it all.snap install ... --classicInstalls the app with "classic" confinement which allows it to access the whole system like a normal native package would. Some apps require this.- Installed apps are located
~/snap/
Downloaded file
Remember to make downloaded files executable via right-click file properties or chmod +x {filename}. Downloaded files will often give you the latest version of software, but the downside is that it might not automatically update the same way managed packages do, so you might need to manually check the developers website and download an updated file each time a new version comes out.
-
.deb package file can usually be double clicked to install. The installer will install any dependencies automatically. These files are specific to Debian based OS such as Ubuntu.
- Or use terminal
sudo dpkg -i {filename} - Or an alternative GUI tools are gdebi
sudo apt install gdebi, or Qapt
- Or use terminal
-
AppImage file (Standalone runnable portable single file, no install required, works on any Linux OS)
- You can "install" an
.appimagefile using the AppImageLauncher tool. This will add/remove launchers to your Desktop Environment as well as manage updates for some apps.
- You can "install" an
-
Binary/zip/folder manual install (see section below)
-
.sh file or installation script/command. Some software simply gives you a command to execute in your terminal which downloads an installer script and runs it.
Virtual machines and Docker (advanced)
Some special types of applications (typically server apps and web interfaces) may either run in their own Virtual Machine or within a container (docker).
From Source or script (advanced)
- Many Linux apps are open source, which means you can download the source code yourself and build the application then install it (or even modify the code yourself!).
- Only use if the instructions explicitly require it or you need a specific version of the app which is not available as a binary release, or you want to modify the code.
- Typically you would either
git clonethe code or download a source archive (usually .tar.gz), extract it, install any required development tools/libraries, and run a command or two in the extracted directory e.g.makeor./install.sh. Once built and installed, you can usually delete the downloaded code.
More detailed comparisons
Where to install system wide applications manually?
e.g. single file binary or zipped folder applications
| Small single file utilities: | /opt/bin/ |
| Larger applications: | /opt/{app name}/ |
If you have trouble running it after installing, try:
- Remember to add the app to your path if required:
Add the line to
~/.profile:export PATH="$PATH:/opt/{app name}/bin" - OR create a symbolic link in the
/opt/binfolder to the executable - Make sure the executable has +x permision:
sudo chmod +x {executable-file-name} - Create a launcher (shortcut) to it (see "Adding an icon shortcut" in chapter 4)
Installing Fonts
Simple install: In Ubuntu Gnome you can double click a font file and click the install button.
Or Manually install system-wide fonts to: /usr/local/share/fonts/
Or Manually install user fonts to either ~/.fonts or ~/.local/share/fonts/
You can use sub-folders to organise
Drivers in Linux
-
Linux Drivers are generally compiled into the kernel (either directly or using modules loaded during runtime), unlike Windows which has separately running drivers.
-
Some hardware vendors only make Windows drivers, but its usually fine, as unlike Windows, it is rare to have to download and install a driver since support for most hardware is already part of the Linux kernel. A notable exception is Nvidia who are heavily proprietary compared with AMD graphics. You will need to download and install an Nvidia driver separately.
-
By default, open source drivers are preferred, but closed source (proprietary) drivers can also be chosen. Some may have benefits of features or performance.
-
modprobecan be used to install/remove modules -
lsmodlists loaded modules -
dpkg is the Debian low level package tool which is often used to install drivers.
-
You can look for installed driver packages using for example:
dpkg -l | grep wacom -
For some very new hardware, it may not be supported by your kernel yet. Potential options:
- Try updating your kernel to a newer one using Mainline (might require disabling Safe-boot in your BIOS as the kernel may not be signed)
- You could also try the newest version of a 3rd party kernel such as xanmod.
- The community may be developing a driver but it is taking some time. If you want to test out a beta/alpha driver you would likely need to compile it yourself or patch and compile your own kernel. If the developer is successful, the driver will eventually be added to the latest Linux Kernel, so you could also just wait for it.
Awesome Software to Install
This is just a list of awesome software I use. There may be alternatives but these are the ones where the most awesome I could find at the time.
- Other tools and tweaks:
- Neofetch
- Veracrypt
- MenuLibre
- Good extras: https://www.youtube.com/watch?v=qTsPLCJdbJw
- Ungoogled Chromium and Firefox
- Firefox or Google Chrome browser with extensions:
- Ublock origin
- Improve YouTube
- Stylebot
- Bitwarden⭐
- Floccus bookmark Sync
- Gnome tweak tool
- gTile
- Ubuntu Restricted extras (codecs)
- GsConnect
- VLC or alternatively mpv or Celluloid
- Calibre (Ebooks)
- Filezilla
- Chrome Remote Desktop
- Virtual Box
- Enable Canonical Partners in Software Update
- Ferdi⭐
- Interesting alternatives:
- uGet download manager (alt to web browser)
- MPV video player (lite alt to VLC)⭐
- Gparted (alt to Gnome disk utility)
- Local scratchpad options (autosaving notepads):
- Notepadqq (Notepad++ clone)
- Xpad (sticky notes style)
- Zim (wiki style)
- Development:
- NeoVim (and/or neovim-qt for GUI support)
- Arduino
- VS Code ⭐
- Go
- minikube
- Plugins for GEdit:
- Putty SSH client
- Content Creation:
- Other options:
- gufw (firewall with GUI)
- TLP (power management)
- KDE extensions/Plasmoids
- Intel P-state and CPUFreq Manager Widget
- Caffeine
Terminal tips
The terminal can seem scary at first but after getting used to it there will usually come a tipping point where you find it more convenient than GUI for many tasks. For example: following an online tutorial showing a series of GUI screenshots saying "click-here, check this, edit this" etc is more arduous compared to following a terminal-only tutorial where you just copy some commands into a prompt or paste into a config file.
Also see Headless Server section of this doc for advanced usage.
Ctrl + Alt + Tto open a new terminal.Ctrl + Wto close.- You can also switch from your Desktop Environment GUI to a plain TTY terminal by pressing
Ctrl + Alt + F3(Ctrl + Alt + F2in Gnome orCtrl + Alt + F1in KDE to return to GUI), useful if your GUI goes haywire. - Your desktop Linux distro will come with some form of GUI terminal app such as Gnome Terminal or Konsole (you can install other terminal apps like Tilix or Terminator with better features like tiling). The terminal app runs a Shell program inside it on startup (default usually
/bin/bash). For headless installations like Ubuntu Server, you can ONLY use the terminal as there is no GUI. - A Shell is a command interpreter; it provides a prompt to enter text commands and display text output from the command/programs. Various commands are either built into the Shell or names of executable programs or scripts that run as children of the Shell (often located in a
binfolder listed in yourPATHvariable).- The common type of shell is
/bin/bash. - Many advanced users like
zsh. - The most primitive type of shell is
/bin/sh. - The most user-friendly shell is
fish, my favourite. Suggest checking it out after learning the basics in your default terminal.
- The common type of shell is
- A shell script is a text file containing a list of commands to execute by a particular shell interpreter. Depending on the shell, you can include if statements and possibly even loops and functions like a primitive programming language. Bash shell script is default and has a
.shfile extension. Fish uses.fishextension. The first line of any script is called the shebang line, and tells your OS which shell or interpreter should be used to run it. Example shebang lines:#!/bin/bash- bash script#!/usr/bin/python- Python script
- Most shells will run some initialization shell script by default on startup.
- The whole desktop environment GUI shell will run
~/.profileupon login. - Bash runs
~/.bashrcon startup. - You can add your global configuration and environment variables in these files.
- The whole desktop environment GUI shell will run
- You can pipe output of one command into another once using
|symbol. For examplecat readme.txtwould show the contents of readme.txt file in the terminal, however you can instead pipe the contents into thelesstool to allow scrolling through a large filecat readme.txt | less - You can also pipe to and from files using:
{command} > filename.txtto pipe output of command into a file (overwrite).{command} >> filename.txtto pipe output of command into a file (append).{command} < filename.txtto pipe file contents into a command.
Basic commands
Must-know commands. Get to know these by heart:
| Command | Description |
|---|---|
tldr {command} | Not essential but recommend to help you learn more quickly, so I mention this first. Type sudo apt install tldr if you dont have it. Shows quick practical information about any command. A potentially more powerful alternative that I now use instead of tldr is cht.sh ⭐ |
man {command} | Show manual page for the command, with long instructions on how to use it |
pwd | Print working directory |
ls | List contents of directory (add -a to show hidden, -l to show details). A much improved alternative is exa. exa -al@ shows all files and details. |
cd {dir} | Change directory |
rm {file} | Delete file (add -rf for directory and contents) DANGEROUS COMMAND - deletes without confirmation, and no recycle bin!! Add -i for a confirmation or replace with a command that moves files to a .trash folder instead. Another good option is trash-cli ⭐ (pip install trash-cli) |
cp {source-file} {dest-file} | Copy file or directory to another location. Multiple source files can be specified. (add -r to include directories). Use rsync for large numbers of files and to monitor progress and in some cases much faster speeds. |
mv {source-file} {dest-file} | Move file or directory to another location (note: hidden files excluded by * operator, run shopt -s dotglob to change this option) |
mv {old-name} {new-name} | Rename a file or directory |
mkdir {dir} | Create a new directory |
clear | Clear terminal output. Shortcut: Ctrl + L |
exit | Close the terminal |
Advanced commands
Learn these gradually. Use a web-search man or tldr for help when needed:
| Command | Description |
|---|---|
apropos {search-term} | Useful for finding commands. Searches through all manual pages, for commands related to search-term. |
alias | Shows all current aliases. Used to assign a long command to run a short one to reduce typing e.g. alias c=clear Add to your .basrc to persist. |
echo | Print some text to terminal. Also print contents of variables e.g. echo $PATH |
rsync | Synchronize a source directory to destination, can be used as a cp replacement for large/many files and also works with remote servers. Add -ah --progress to show progress while copying |
less | Display text from a file or stream in scrollable terminal. more is another option but only allows one way scrolling and may be slow due to loading a whole file at once |
cat | Concatenate/show text from a file or stream |
ifconfig | Show IP address, MAC and other network settings |
wget | Download a file from URL |
curl | Send/Receive data via URLs (e.g. using POST or GET) |
ln | Create symbolic link |
find | Find files e.g: find ~/ -iname *.desktop Also run a command on each search result add:-exec cp "{}" /home/shantanu/tosend \; |
locate | Find files quickly by searching file index database. In case some recent files are missing, you can manually update database sudo updatedb |
sed | Find and replace in text |
awk | Split text into fields and filter by keywords |
cut | Select and display fields from text |
grep | Regular expression (and pipe | operator). Can also be used for "Find in Files" operation, i.e. to recursively find all text files containing a given string e.g. grep -rIH 'TEXT_TO_FIND' (I = ignores binary files) |
which | Find location of an executable on path |
df | List mounted volumes ans usage, use -h to make it more readable. |
mount/umount | Mount or unmount a volume, such as a USB drive. Type fdisk -l or lsblk to list available block devices for mounting. Type findmnt or mount to show currently mounted devices. |
chmod | Change file attributes and permissions (executable, readonly etc) |
chown | Change file ownership |
watch | Run a process every 2 seconds (configurable) and monitor its output/errors. |
ps | List processes. -A to list all running processes. |
top or htop | Real-time process and performance viewer/manager |
kill or pkill | Kill or send other signals to processes |
tail | Display the last 10 lines of a text file, monitor it and display any changes - perfect for monitoring a log file. e.g. tail -f /var/log/app/status.log |
More Terminal Inspiration: Terminal all-time greats
Initialisation scripts
When a terminal is launched, there are various scripts that run automatically on startup and can be different depending on the type of session (e.g. Bash, Zsh or Fish etc), and whether login shell (where you enter user/password) or non-login shell (e.g. launching a terminal window after already logged in as a user).
You can add things like:
- Environment variables e.g.
export MYHOME="$HOME/Documents/myhome" - Add executables to PATH e.g.
export PATH="$PATH:/path/to/apps/bin" - Command aliases e.g.
alias c=clear - Set default settings, e.g. colors and format for the prompt
- Autorun programs e.g. show current weather or a cool message/picture on startup
Which script file you add them to depends on whether you want the change to be specific to a user, specific to a session type, or system wide for any session.
User-specific
-
Login shell:
~/.profile- default for all sessions~/.bash_login- if it exists, replaces and overrides above for bash sessions~/.bash_profile- if it exists, replaces and overrides all above for bash sessions
-
Non-login shell:
~/.bashrc- specific to bash session~/.config/fish/config.fish- specific to fish session
System-wide
- Login shell:
/etc/profile- for all sessions - Non-login shell:
/etc/bash.bashrc- specific to bash session/etc/fish/config.fish- specific to fish session
Copy and Paste in terminal windows:
Option 1: Using the desktop-environment clipboard
- Copy: Select text by dragging mouse over text or double click to select word. The press
Ctrl+Shift+Cto copy. Alternatively,Ctrl+RightClickbrings up a context menu in many terminals that allows copying. - Paste: Paste into the terminal by pressing
Ctrl+Shift+V. Alternatively,Ctrl+RightClickbrings up a context menu in many terminals that allows pasting.
Option 2: use the terminals own separate internal clipboard:
- Copy: Select text by dragging mouse over text or double click to select word. When you let go of the mouse button, the selected text is copied to the internal clipboard.
- Paste: Move cursor to destination and click the Middle mouse button to paste.
Option 3: using commands
- use
xclipandxselcommands to pipe text to and from either the terminal or system keyboards.
Generic Hotkeys
Unless specified, these should work on most shells like Bash and Fish. Consult the docs for your shell for more.
| Key | Operation |
|---|---|
Ctrl+L | Clear the screen |
Ctrl+C | Clear the currently entered command, or terminate currently running application |
Ctrl+K | Clear the currently entered command from cursor to end of line |
Ctrl+U | Clear the currently entered command from cursor to beginning |
Ctrl+W | Delete the current word under cursor until beginning of word |
Alt+D | Delete the current word under cursor until end of word |
Alt+L | (FISH ONLY) List files in current directory |
Move hidden files by default (in a bash shell with mv)
When you first use mv to move or rename folders containing files, you may notice it skips hidden files (i.e. names starting with .), which is a concern! You can change this default setting using shopt to edit shell options:
- Set (enable) show/move hidden files⭐:
shopt -s dotglob nullglob - Un-set (disable) show/move hidden files:
shopt -u dotglob nullglob
Super user (sudo)
Commands are normally run as the current logged in user.
For super-user permissions run with sudo before the command.
OR to switch the current terminal session to root: sudo -s (limit this use, for security)
(note su command doesn’t work in Ubuntu by default as root login is disabled)
User terminal is denoted by a $ and root/super-user terminal is denoted by #
When you run a sudo command, sometimes you want to keep the current users environment variables (e.g. settings from .bashrc or vim config). To do this, use sudo -E. For example, this is especially useful if you heavily customized your vim text editor for your current user and you want to be able to use the same customizations when editing as root.
WARNING: Dont be tempted to do everything as a super user or root! This is NOT like a Windows user with admin priviledges. When you run as root/sudo you are literally running programs and creating files as a different user and when you switch back you may not be able to access them! You may also break the system or have security problems when over-using root access. Stick to your regular user and only use root when needed.
Start a {command} in the terminal and allow it to continue in background after closing
{command} &
disown
GZ (gunzip) or extract a file
Zip a file or dir into archive.tar.gz (multiple files and dirs can be specified)
tar -czf archive.tar.gz {file-to-zip}
Unzip archive.tar.gz into (optional) destination dir
tar -xzf archive.tar.gz -C {dest-dir}
Add v flag for verbose mode (list all files processed)
ZIP archiving and UNZIP extraction
sudo apt install zip unzip

zip singlefile.zip original_file
zip -r directory.zip original_dir
unzip {zipfile} -d {destination-directory}
Foreground and background app in terminal
Press Ctrl + Z in console will set current app to background (stopped)
To go back to it, type fg
To allow the stopped background app to continue in the background, type bg
You can list child process of current shell using ($$ means current shell process):
pgrep -P $$
Then disown them to allow running after closing the shell session
Nano: Simple default text editor in terminal
Use nano {filename} for a simple file editor or vim (or a fork like neovim) if you want a lot more power and efficiency (but a steep learning curve).
Nano keyboard shortcuts: Can seem unconventional due to restrictions of key combos in terminal If you don’t like them, you may be able to use Select/Copy/Paste of your terminal instead, see Copy and Paste section above.
| Shortcut | Function |
|---|---|
| Alt + U | Undo (shown as M-U in the terminal UI) |
| Alt + E | Redo (shown as M-E) |
| Ctrl + W | Search |
| Alt + W | Search again |
| Ctrl + X | Exit (it will ask to save, press y) |
| Shift + {arrow} | Select text |
| Alt + 6 | Copy |
| Ctrl + K | Cut |
| Ctrl + U | Paste |
| Esc + 3 | Comment out selected block (default with #) |
Recommended settings:
Edit settings: sudo nano /etc/nanorc
Uncomment the following to enable line numbers, mouse, wordwrap and auto-indent:
set mouse
set linenumbers
set softwrap
set autoindent
Micro: The Best intuitive text editor in terminal
If you want a great text editor which is easy to use and powerful, and you don't want to learn Vim go with micro ⭐. If you want to know why it is so "intuitive", basically keyboard shortcuts like ctrl+Q ctrl+C ctrl+V ctrl+X ctrl+F ctrl+A etc all do what you expect them to do, with zero learning curve. Here is the download link (can also be installed via apt package manager, but the snap or repo releases are more up to date. Personally I used brew to install it).
Set micro as default console editor (type which micro to get PATH_TO_MICRO):
sudo update-alternatives --install /usr/bin/editor editor PATH_TO_MICRO 50
sudo update-alternatives --config editor
sudo update-alternatives --install /usr/bin/sensible-editor sensible-editor PATH_TO_MICRO 50
sudo update-alternatives --config sensible-editor
You should also set the EDITOR=micro environment variable if you want certain shell commands to use it as default.
Copy/Paste with SSH session to host clipboard:
Unlike Vim and Nano, Micro captures the mouse in the terminal, even when using SSH. Therefore to copy and paste text to/from a terminal SSH session host using mouse, you need to hold shift and mouse select, then ctrl + shift + C or shift + right click to copy to host clipboard.
If you want to copy and paste multi-line selected text when in SSH from one file to another, do this within the same micro session, just use ctrl + c to copy to internal micro clipboard then press ctrl + o to open the second file and ctrl + v to paste it.
Vim: Powerful text editor in terminal
Vim is good to learn if you want to do a lot of editing of text files, config or code, however it has a steep learning curve and is completely unusable without at least knowing some basic, such as the modes listed below.
It is a text editor with roots in the 70s, and is designed to be ultra-efficient by avoiding use of the mouse, and ultra-extensible with plugins for myriad useful functionality (see section below for essential starter plugins). It achieves this through reusing keys depending on what mode the editor is in (much easier to visualize the current mode with plugins like airline).
I prefer the neovim fork, as it's been refactored to unlock future potential. A key difference with neovim is the config file is located ~/.config/nvim/init.vim instead of ~/.vimrc. Another fork to check out is SpaceVim, which takes a distro-like apprach to Vim with plugins as layers depending on the type of project you are working on.
If you like neovim, try neovim-qt, a GUI wrapper which adds a few features such as drag and drop a file to open, a file tree browser, and basic mouse support (cursor, selecting/resizing sub windows and scrolling). Another upcoming GUI with VS Code style functionality using neovim, is Onivim 2.
Basic modes of Vim include:
-
Normal (DEFAULT mode at start, enter commands, navigate text quickly)
HitESCto return to this mode any time. To get you started, some easy commands:- Search: Hit
/and type to search text, pressenterthennorNto navigate back and forth results. - Undo:
uRedo:Ctrl + r - Delete (aka Cut) lines:
x- delete current character3x- delete 3 charactersdw- delete current word (tryWfor WORDs)dd- delete current line5dd- delete five linesd$- delete to end of lined0- delete to beginning of line:1,.d- delete to beginning of file:.,$d- delete to end of file
- Switch between different panels:
Ctrl + w, w
- Search: Hit
-
Command (global commands e.g
w {name}= save,q= quit,e {name}= open)
Hit:from Normal mode to activate. -
Insert (usual text entry mode, Type text as you would expect)
Hitifrom Normal mode to activate. -
Visual Hit
v(orVfor line-wise) from Normal mode. Allows visually selecting text with arrow keys.y- yank (copy) selection3yy- yank (copy) 3 lines2yw- yank (copy) 2 words (tryWfor WORDs)p- paste after cursorP- paste before cursorf}- select until next occurance of}on current line (can be any character)F<- select until previous occurance of<on current line (can be any character)
-
Here is a good quick starter tutorial.
-
Some good default setup config.
-
VS Code users coming to Vim
- Intro for VS Code users
- Use NeoVim embedded in VS Code (performance can be slow)
- Make Vim into an IDE like VS Code
-
Cheat sheet within Vim plugin (see bellow to install). Highly recommended to help you learn quickly.
- Type
\then?to show it,qto hide
- Type
Recommended Settings:
For Neovim, suggest adding this line to sync Vim clipboard register to system clipboard when using yank and paste:
set clipboard+=unnamedplus
Vim Plugins:
FIRST suggest to install a plugin manager such as vim-plug Add add a few good plugins to your vim config file like:
Plug 'tpope/vim-sensible'
Plug 'vim-airline/vim-airline'
Plug 'preservim/nerdtree'
Plug 'vim-airline/vim-airline-themes'
Plug 'preservim/nerdtree'
Plug 'tpope/vim-fugitive'
Plug 'scrooloose/syntastic'
Plug 'ctrlpvim/ctrlp.vim'
Plug 'lifepillar/vim-cheat40'
Plug 'ycm-core/YouCompleteMe'
# YCM: Run 'python3 install.py --all' in plugin dir (.local/share/nvim/plugged/youcompleteme/) to complete installation or update.
#YCM: If using neovim, also run 'pip install --upgrade pynvim' to enable Python support
Remember to run :PlugInstall within Vim to complete installation after adding any plugins to.
Update plugins - :PlugUpdate
Update vim-plug itself - :PlugUpgrade
Delete a plugin - Remove it from your vim config then run :PlugClean
More:
- A list of AWESOME plugins for Vim
- A guy explaining his advanced customizations
- Setting up advanced fast auto complete (YouCompleteMe plugin and language server, remember to complete installation run
python3 install.py --allin the plugins installed directory - normally~/.local/share/nvim/plugged/youcompleteme/)
Open working directory in a GUI file browser window
xdg-open .
This also opens any file or folder using the default app.
Environment variables and path
To add to EVs and path, you can edit a number of files depending on requirements:
https://superuser.com/questions/789448/choosing-between-bashrc-profile-bash-profile-etc
Note that if you modify .profile, this will only be reloaded AFTER logging in again, so you must either restart the PC or run source ~/.profile to load it immediately. If you modify .bashrc, you just need to restart the terminal session or source it.
Note for Fish shell > v3.2, you can use fish_add_path to permanently add to the path. e.g. fish_add_path /usr/local/go/bin
Cool Terminals
Alternatives to the built in terminal app (e.g. Gnome Terminal or Konsole). To change your default terminal:
sudo update-alternatives --config x-terminal-emulator
- Tilix - GPU accelerated, tiling terminal, search, pwd manager, optional ‘Quake’ mode.⭐
- hyper - Modern extensible Electron based terminal
- Alacritty - GPU accelerated, claims to be the fastest, but many question that
- cool-retro-term - Cool looking retro CRT style terminal
- Yakuake - ‘Quake’ style drop down terminal for KDE using Konsole
Cool Shells
- The popular posix compliant shell alternative to Bash: Zsh
- A UX-focused shell (my daily driver): Fish (Friendly Interactive SHell)⭐
- Type
fish_configto launch web config GUI or edit the files (config.fish) in~/.config/fish/- Oh My Fish package and theme manager (
omf themeto find themes) - Explore what fish can do online without installing.
- Oh My Fish package and theme manager (
- Type
- A UX-focused shell (my daily driver): Fish (Friendly Interactive SHell)⭐
Cool terminal addons
-
Check out this guide for a ready-to-go beautification or install various options as per below.
-
Sensible defaults for bash
-
A beautiful UX-focused shell prompt: Starship can be added to Bash, Fish, Zsh or many others ⭐
Customizing and Improving the Desktop
Useful tweaks for KDE
https://userbase.kde.org/Plasma/Tips
Awesome tweaks to install
- Look & Feel
- GNOME
- Dash to Dock Gnome extension (Mac style center dock Lite) UPDATE: now built into Ubuntu 20.04. You can still install and disable it to get the settings GUI.
- Arc menu Gnome extension⭐
- KDE
- KDE built in widgets:
- Global Menu
- Application Launcher
- Pager
- Latte Dock (replace Plasma dock/panel, use as both top panel and bottom dock)
- Window Title applet
- Window Buttons applet
- Event Calendar Excellent replacement of clock/calendar widget
- KDE built in widgets:
- KDE Mac OS Style:
- Install this Latte Dock Layout plus the listed dependency widgets
- Kvantum (KDE)
sudo apt install qt5-style-kvantum qt5-style-kvantum-themes- Allows use of advanced SVG theming which looks more refined and with blurred transparency.
- McMojave is a nice looking Kvantum theme.
- To complete transparency support for all apps/menus:
- Install and configure this kwin script
- Also enable Blur and Transparency under System Settings > Workspace Behaviour > Desktop Effects
- GNOME
- Icon sets:
- Wallpapers:
- Flat wallpapers: https://wallpaperaccess.com/4k-flat
- Gnome Extensions:
- Sound Input and Output device chooser (Gnome tweaks extension)⭐
- Removable drive menu (Gnome tweaks extension)
- GPaste (image support is buggy, suggest disable. Ctrl+Alt+S hides password). A better alternative might be Copy Q.⭐
- Status Area Horizontal Spacing
- Caffeine⭐
- Argos (easily create your own tray utilities)
- Flameshot For taking screenshots
- Drop-down Terminal (works in Wayland)⭐
KDE Tray icons not following current theme
The tray icons are set based on the current Plasma Style in System Settings, not your current Icon Set. Therefore the icon set you apply may not apply in the Tray and status icons. You need to find a Plasma Style (or Global Theme) that uses the icon set you want, for example try Arc KDE for Papirus icons.
Try searching for your icon set by name in the Get New Plasma Style dialog in System Settings. Dont worry about the Plasma Style screwing up your currently applied theme, as this is overridden by Application Style.
Using a Runner (KRunner)
This is nice powerful (almost “hidden”) function of KDE. Default press Alt+F2 top bring it up and try typing various things, from running an application, dictionary definitions, maths equations, currency conversion and more.
Learn more: https://userbase.kde.org/Plasma/Krunner/ https://www.youtube.com/watch?v=NTNw5IumQtk&t=408s
KRunner advanced settings:
~/.config/krunnerrc
Alternatives to KRunner:
Making your own KDE Extensions (KDE Plasma widgets, applets, tray utilities, add-ons or Plasmoids)
These can easily be written in Qt/QML in any text editor. An overview here: https://community.kde.org/Plasma/DeveloperGuide More practical guides on coding/structuring the widget: https://techbase.kde.org/Development/Tutorials/Plasma5/QML2/GettingStarted https://techbase.kde.org/Development/Tutorials/Plasma5/QML2/HelloWorld When testing your QML widget you can use this to immediately try it out and debug:
plasmoidviewer -a {path-to-package} -l bottomedge -f horizontal
Use this to install (-i to install -r to remove and -u to update):
kpackagetool5 -t Plasma/Applet -i {path-to-package}
After install/update you might need to refresh QML cache for your panel/docks to see the changes, by killing and reloading them:
killall plasmashell; kstart5 plasmashell
OR if using Latte Dock instead of default Plasma:
killall latte-dock; kstart5 latte-dock
Another approach for simple widgets without coding is to use Argos/Kargos/BitBar which allows creation of tray widgets using a shell script.
Adding an icon shortcut (a Launcher) in Gnome or changing icon of existing launcher
Use a Main Menu GUI tool or launcher manager e.g. sudo apt-get install menulibre
OR manually add launcher (.desktop file):
Edit/Add Launcher files in directory /usr/share/applications (system wide), or ~/.local/share/applications (local user)
Full .desktop reference.
For icon files, place the png file in /usr/share/pixmaps/ and link to its filename it in the .desktop file (minus the png file extension)
To refresh shortcuts run: sudo update-desktop-database, though normally its automatic
For terminal applications which you want to run in their own window with icon and name in launcher, make sure to set up the launcher as follows:
Exec=gnome-terminal -e "micro %F" -t "Micro" --hide-menubar --name=Micro --class=micro
StartupNotify=true
Terminal=false
TIP: Use cuttlefish to browser and search for icons.
Installing and removing a new Desktop Environment (NOT recommended):
Warning: Manually installing alternative DE alongside the default can cause unforeseen issues. https://askubuntu.com/questions/961580/completely-remove-budgie
Win+E shortcut to open file manager:
If it doesn't work by default, Open System Settings > Devices > Keyboard, look for Launchers > Home folder and add Super+E key combination.
Show/Hide Desktop keyboard shortcut:
Default is Ctrl+Super+D, you can change it to Windows-style Super+D under
Open System Settings > Devices > Keyboard, look for Navigation > Hide all normal windows
Change Grub bootloader timeout:
Easy way to speed up boot.
    sudo nano /etc/default/grub
    sudo update-grub
Switch Python to Python 3 (if defaults to 2.7 which is discontinued)
Python 3 may be pre-installed but not set as default, if you run python and it's not found, try python3 to see if it is found. Set up the default by running this. Also set up default for pip in the same way.
Visual Tweaks
Improved font rendering
One thing I noticed when coming to Linux was a subtle "unpolished" look to the font rendering. It was hard to exactly put my finger on but there was always something about the system-wide font rendering that just looked ever so slightly "off" compared to Mac and Windows.
One way to improve font rendering is to add this line to your /etc/environment file and reboot.
FREETYPE_PROPERTIES="cff:no-stem-darkening=0 autofitter:no-stem-darkening=0"
This makes fonts generally more pleasing, however you may find in some cases definition is lost due to the thickness of font, for example the dot in lower case "i" making it hard to distinguish from uppercase "I" in some fonts.
Screenshots and Capture
Depends on your desktop environment. Ubuntu default: PrtScr Saves desktop screenshot.png in Pictures folder + clipboard Shift + PrtScr Saves selected area to Pictures folder (esc to cancel) Alt + PrtScr Saves current window to Pictures folder Ctrl + {Any above} Copies desktop to clipboard instead of saving file
KDE/Kubuntu: Hit PrtScr key to launch Spectacle too.
Record all the audio output of pc speaker plus microphone (e.g. a conference call):
sudo add-apt-repository ppa:audio-recorder/ppa sudo apt-get update && sudo apt-get install audio-recorder
Launch audio recorder and do custom source, go to advanced settings and choose headset output and headset microphone input as recording devices.
Record screen (screencast) as well (window, monitor, or area):
Default Gnome : Ctrl+Alt+Shift+R to start/stop, will save to Videos folder. Or try kazam.
sudo apt install kazam
Navigation and Usability
Move apps around screen:
Win + Arrow keys move around display Win + Shift + Arrow keys move to different monitor
Create a new file using right click context menu in file browser (~/Templates)
https://vitux.com/add-new-document-back-to-the-right-click-menu-in-ubuntu-18-04/
Running scripts, commands or apps on boot/startup:
There are several methods to achieve this, depending at which moment you want it to run:
- EASY GUI method for your distro: Note it will only run for the current user when they login.
- Kubuntu: look for Autostart settings
- Ubuntu Gnome: look for Startup Applications settings
- crontab: See section below. Add a line
@reboot <command>. Cron is very powerful and also allows running scripts on specific events or at regular intervals. - init.d: Place the executable or a link in
/etc/init.d(as root). You may additionally need to runsudo update-rc.d /etc/init.d/nameofscript.sh defaultsright after updating that folder. Remember to make the script executable after copying withchmod +x - rc.local: Add commands to
/etc/rc.local, which will run on next startup. - system.d service: Advanced, creates a service which can be enabled or disabled, or set to auto reload if it crashes etc. Example.
- Terminal initialisation files: Depending when exactly you want it to run (e.g. on boot, on specific users login, or on starting a new terminal session), add it to the appropriate init file, see Terminal > Initialisation scripts. For example add to
~/.bash_profileor~/.bash_logoutto run on user login or logout.
Automating/scheduling running of scripts using Crontab:
The “real” crontab is located in: /var/spool/cron/crontabs
However it is deliberately near impossible to view or edit it directly.
Instead use the following commands:
Edit current users crontab: crontab -e
Edit root crontab: sudo crontab -e
GUI tool for editing crontabs:
npm install -g crontab-ui
Remember that paths in crontab lines must be full paths e.g. instead of npx, use /usr/local/bin/npx or whatever is returned by which npx.
To test cron jobs: change the jobs timer to * * * * * and wait approx 1 minute for it to run. You can check if it actually ran using systemctl status cron. To see the commands output, you can redirect it to a file in the cron command using >> or tee.
Multiple commands in one job: You can include multiple commands in a cron job either by putting them in a script or joining them into one line using &&.
Commands not running: First change executables to their full path, then try adding a cd command to the start to make sure you are in the right directory, and finally try running as its own terminal command like fish -C "the command" or bash -c "the command"
Show/Hide hidden files in File browser
Ctrl + h
or in KDE Dolphin Alt + . can also be used
Nautilus File Manager Tweaks
Open as Administrator within File manager
sudo apt install nautilus-admin
Right click on a file or folder and you will be able to open a Admin. If you get an error, see this.
Open a folder in VS Code
https://github.com/harry-cpp/code-nautilus
Built in terminal in file manager
https://github.com/flozz/nautilus-terminal (Press F4 to show/hide)
Change folder colors
- https://github.com/PapirusDevelopmentTeam/papirus-folders (change global folder icon theme)
- http://foldercolor.tuxfamily.org/ (context menu per-folder setting)
- https://github.com/bilelmoussaoui/nautilus-folder-icons (A much easier GUI for selecting folder icons)
Remote Access
To access your PC remotely you can use either XRDP or VNC. I recommend VNC as it is natively supported in Ubuntu and Kubuntu. For client application I would recommend Remmina.
For Ubuntu or GNOME simply enable it in System Settings under Sharing > Screen Sharing. Highly recommend setting a password.
For Kubuntu or KDE, install Krfb (sudo apt install krfb) and similarly enable it and set a password.
Installing and using Windows applications on Linux
Undoubtedly, if you are using Linux everyday, you may eventually need to run software that is only available on Windows. Firstly, if you have Wine set up, just click on the programs installer or exe file and see if it runs to completion - often you will be presently surprised that the exe "just works". Wine should automatically place a shortcut to the installed app on your Linux desktop if it succeeded, so you can run it again in future. If it doesn't work or needs direct USB/hardware access, then you may need to resort to using it within a minimal Windows VM.
Wine (Recommended to try first for simple apps/installers)
Wine is a subsystem for running Windows exes on Linux. It runs them within a “context” which is a folder containing a full simulation of a typical Windows file-system (containing C:\Windows, C:\Program Files\ etc), with all the basic OS libraries, registry and settings to run it. Within each context (which could be 32 or 64 bit... usually 32 is more stable) you can install multiple applications and dependencies (like .NET or its open-source equivalent Mono). Often you may want a separate context for each Windows program (this is how Play On Linux typically works).
https://itsfoss.com/use-windows-applications-linux/ First try using PlayonLinux as it is normally easiest, and see how far you get. For games you could try Lutris. You can also try Install wine and winetricks separately and follow some tips below:
- Default wineprefix is 64bit (
~/.wine) You can create another one 32 bit using:WINEPREFIX=~/.wine32 WINEARCH=win32 winecfg - You can also tell Wine to use this prefix for all subsequent commands:
export WINEPREFIX=~/.wine32 - 32 bit programs running on 32 bit prefix seem to be more reliable.
- Install common dependencies using:
winetricks corefonts dotnet40 - WineHQ has tips on installing specific apps, e.g.: https://appdb.winehq.org/objectManager.php?sClass=version&iId=33276
- If you see missing text or fonts try on or more of the following:
- Suggestions here: https://askubuntu.com/questions/1069103/missing-fonts-in-acrobat-reader-in-wine
- Run:
winetricks allfonts - Download and install windows 7 fonts
- Run:
Using Virtual Box (Recommended for complex apps)
Virtual Box works surprisingly well but requires a few seconds to boot up or save/restore machine state. Most USB devices can be shared and files can be drag and drop between host and target. Other VM software can be used such as QEMU/KVM and VMWare but Virtual Box is easy to use. Performance is good enough for office work but it can eat up RAM. If you have a GPU capable of pass-through you can achieve excellent performance and even play games.
- Install the latest version of VirtualBox as long as your host and target are 64 bit and the host has hardware virtualisation.
- Download the latest Windows 10 Image.
- Create a new Windows 10 VM. I used 4GB Ram, 2 CPUs, 50GB volume, GPU acceleration on, VBoxSVGA, 128MB video memory, Acceleration: Hyper-V or KVM.
- Insert Win 10 image and install. You do not need a product key to activate, you just get a minor nag message in settings but otherwise it works fine.
- Once installed, make sure you install Guest Additions CD on target and VirtualBox Extension Pack on host.
- To make things work seamlessly, enable these VM settings:
- Drag and drop
- Pass through audio and optionally webcam
- Share clipboard
- Optionally you can set up a shared folder which maps a hosts folder to a drive letter on the target.
- Optionally if you want to use USB devices directly (e.g. external Bitlocker HDD or to update firmware on a keyboard), you should enable permissions (run
sudo -a <username> vboxusersthen restart PC) and USB filter in VirtualBox settings. Then you will be able to connect USB devices directly to the VM at the hardware level through the Virtual Box menus when the VM is running.
- To make the VM shutdown safely when closed by host:
- In the Windows VM open the start menu and type "Choose a power plan" and press enter.
- Then click "Choose what the Power buttons do" and set Power Button to Shutdown.
- If there are graphical glitches or performance issues, turn OFF GPU acceleration and see if it improves.
- Would recommend to run a Windows 10 debloat to remove crap-ware and speed things up as wel las reduce used space.
- You can also speed up boot at the expense of security by disabling login password.
Other possibilities for running Windows apps on Linux:
- React OS - and open source reverse engineering of Windows (could do a VM or dual boot)
- Dual boot Windows 10
- Run your own Windows PC or cloud Windows VM and remote into it.
Microsoft Office options
Yes I know, there is no true replacement for locally installed Microsoft Office. Google docs, Libre, Open Office (even Microsoft’s own Office Online and mobile versions) do not preserve formatting of files created in MS Office. It is available for Windows and Mac only, so here are your alternatives:
- MS Office online (or mobile, Windows store versions):
- Not good for docs, destroys formatting even worse than open office or Google docs. Even Microsoft says it is broken and don’t think they want to fix it.
- Excel online is ok unless you use advanced features
- Collaboration is near-useless.
- Google Docs
- OK, some formatting differences, great for collaboration
- Can directly edit word doc without converting to gdoc
- Libre Office:
- OK, some minor formatting differences.
- Windows 10 VM on Virtual Box with ANY version of Office installed
- Good option if you have a decent PC, as it just works perfectly
- You dont need a Win 10 activation code/license
- See instructions above about using Virtual Box
- Wine/PlayOnLinux (Good ONLY if you have Office 2007):
- Tested install Office 2007 using PlayOnLinux (PoL) 32bit prefix, works fine.
- Install SP1 then SP3 by running each exe in virtual machine option in PoL.
- https://help.ubuntu.com/community/Microsoft_Office
- You could also install Visio and project, but these are old and outdated. Better option for Visio is FOSS Diagrams.net (formerly draw.io)
- Optional:
- Enable wine font smoothing (recommend)
- Install any Win XP theme to improve look and feel: Royale Noir Ubuntu Light
Skype for Business (Lync)
If you have to talk to a crummy corporate in order to take some of the money they hoard, most likely you will be using some old-ass version of Lync or S4B. Unlikely Microsoft will be making a Linux client any time soon, nor a “just works” web version, as it is End-of-Life in July 2021 (although most corporates no doubt will continue to use their onsite version for another decade). They are doing a Teams client for Linux so they might change their ways for future products.
Options:
- Virtual Box (Win 10 virtual machine works perfectly but you can’t use screen share for Linux host apps). This is the best option to me. Instructions in above section.⭐
- https://tel.red/linux.php (paid)
- Dual booting into Windows or using another Windows PC.
Running Adobe Applications
Anything made by Adobe doesn’t work in Linux and I doubt they will make it work because its not only a tiny user-base but Adobe's strong proprietary culture is extremely opposite to Linux, and the users will mostly use FOSS alternatives anyway. There is potential they may remake some tools into limited web app versions running on the cloud in the long term future. There was once a Linux version of Acrobat Reader but that ended in 2013 so it’s not recommended. Here are some options:
- Install Adobe applications on a Windows Virtual Box VM. Works flawlessly with the right GPU and pass-through.
- Install Adobe applications using Wine or PlayOnLinux (Acrobat and Lightroom may work through Wine).
- Some apps may be packaged such as Acrobat Reader: https://snapcraft.io/acrordrdc
- Try Android or Chrome OS versions of Adobe apps using Anbox.
- Use a Linux compatible FOSS replacement for Adobe tools:
| Adobe App | Alternative |
|---|---|
| Acrobat Reader | Document Viewer (Ubuntu default evince) Chrome browser Acrobat DC PDF Arranger (arrange/merge pages) Foxit Reader (add text, forms, signatures) LibreOffice Draw or Inkscape (deep content edits) Qoppa PDF Studio |
| Premier Pro | KdenLive, Blender (surprisingly good), Davinci Resolve ($) |
| After Effects | Natron |
| Audition | Audacity (or Tenacity) Ardour |
| Photoshop | Gimp (with useful plugins) Krita |
| Lightroom | DarkTable Lightroom 4.4 (Wine or VM) |
| Illustrator | Inkscape |
| InDesign | Scribus |
| Dreamweaver | Blue Griffon (free and $), Firefox Developer Edition |
Running Mac OSX Applications
Even though the Darwin kernel underlying Mac OS is open source and Unix-based, there is a heavy layer of proprietary libraries over the top. The only real option is to run apps in a VM either locally or in the cloud.
This tutorial worked perfectly in Ubuntu with VirtualBox but framerate is a bit slow without a compatible GPU support
Other options:
- https://github.com/foxlet/macOS-Simple-KVM
- https://www.youtube.com/watch?v=HipxJJhDPHA The key with geting a smooth MacOS VM experience is not only a good GPU, but the right GPU which can be passed-through to the VM. AMD dedicated PCIe gaming GPUs tend to work best.
Run Android apps on Ubuntu using Anbox
This is EXPERIMENTAL. For Ubuntu the required anbox-modules did not install in the kernel properly (maybe due to secure boot), so I followed the details instructions here from source: https://github.com/anbox/anbox-modules You will then need to reboot and do the trusted UEFI key install (using the password you entered during module install).
Then install anbox via the PPA https://docs.anbox.io/userguide/install.html https://github.com/anbox/anbox/blob/master/docs/install.md https://www.linuxuprising.com/2018/07/anbox-how-to-install-google-play-store.html
To get audio/video playback working: Run:
sudo snap set anbox rootfs-overlay.enable=true
Download media_codecs.xml.txt and run:
sudo cp media_codecs.xml.txt /var/snap/anbox/common/rootfs-overlay/system/etc/media_codecs.xml
Reboot. More info.
UPDATE 2022: With a kernel 5.18 or higher, ashmem has been completely removed in favour of memfd, so as long as Anbox still uses ashmem (it is a huge dev task to change it to memfd, so its not happenening any time soon), there is a complex process to get it back again. A more foolproof way might be to install Android-x86 in a VirtualBox or other VM software.
Running Java Applications
Java is cross platform but Ubuntu ships with the OpenJDK which may not run some Java apps. You can instead get the official Oracle/Sun proprietary version. After installing, switch alternatives for java using:
sudo update-alternatives --config java
Install Windows core fonts (Arial, Times Roman etc)
Recommended to install using:
sudo apt-get install ttf-mscorefonts-installer
sudo fc-cache -f
After that, check with:
fc-match Arial
PDF handling
-
View and annotate PDFs:
- Okular has superior annotation features and good touch support. Install flatpak version on Gnome.
- EVince is recommended for a fast minimalist viewer with multi-touch and night-mode. Be sure to enable larger zoom levels using this command:
gsettings set org.gnome.Evince page-cache-size 500 - Or built in Document Viewer for your desktop environment or Chrome or Firefox.
-
Edit, Delete, Join and Reorder pages in pdfs:
-
Sign and edit pdf content:
-
Master PDF (paid) Really snappy and full featured PDF editor. Give it a try with free version (watermarks).
-
Qoppa PDF Studio (paid) Slower start time (Java) but extremely powerful well featured PDF editor, with very easy to use PDF signing and editing. The closest thing to Adobe Acrobat DC, and worth the money if you are looking for something equivalent.
-
Okular Latest version can sign PDFs using certificates stored in Firefox. It cannot create certificates though. To create a certificate for signing PDFs in Okular:
- Create a self-signed certificate. Suggest making it last 5 years (1825 days). This will give you the public key/cert (.crt) and private key (.key).
- Then convert these to one password protected certificate (.pfx) file containing both private and public keys:
openssl pkcs12 -export -out certificate.pfx -inkey privateKey.key -in certificate.crt - Now import this into Firefox. Go to Settings > Privacy & Security > Certificates > View Certificates. Go to Your Certificates and click Import... and select the .pfx file.
- Now you will be able to select this certificate to digitally sign your PDFs in Okular.
-
Foxit Reader (Linux native, outdated)Warning: There may be a bug causing Foxit to crash on save, after filling in and adding signature to a form, when run using a .desktop or menu launcher. Test if it happens to you. Fix it by running Foxit from terminal using
/opt/foxitsoftware/foxitreader/FoxitReader.sh %F
OR
Edit the.desktoplauncher so that it runs in a terminal. -
Foxit Reader (Windows version via Wine)UPDATE: doesn't really work in Wine anymore?
The Linux version of Foxit is outdated and buggy and it is unclear whether it will be updated. A better option may be to install and run the Windows version using Wine. If you have Wine installed, just download the windows installer for Foxit and install it and it should work perfectly within Linux.
-
-
Print to PDF
Some apps like gEdit and Chrome have built-in save to PDF support. For generic print to PDF support for all apps:sudo apt-get install printer-driver-cups-pdf
Other work applications
Personal finance
HomeBank for a quality local application with CSV import Firefly III for a comprehensive self-hosted app including mobile support.
Change default text editor (in this case to notepadqq)
sudo update-alternatives --install /usr/bin/gnome-text-editor gnome-text-editor /usr/bin/notepadqq 50
sudo update-alternatives --config gnome-text-editor
Libby/Overdrive library and Kindle ebooks
Use Web version Libby: https://libbyapp.com/shelf Use Web version of Kindle: https://read.amazon.com
Backups, Encryption and Security
Backing up your files
I use 5 types of backups:
- Home files online disaster recovery backup - runs couple times a week.
- Local System restore for troubleshooting or disaster recovery - runs automatically once a week.
- Cloud drive not really a backup but a convenient way to store and access working files and never lose them.
- Settings sync: Basically dot files which are already backed up in Home but this is really convenience to allow easy editing and sync of settings between PCs.
- Disk image: This takes an entire image of a disk to be copied directly to another disk. Used only occasionally for backing up bootable SD cards, servers or upgrading SSD/HDD.
Home files Incremental Backup (using Duplicati + your cloud provider)
I currently use Duplicati + Wasabi cloud storage ⭐. The latest version 2.0 is very easy to set up and use.
Home files Incremental Backup (using iDrive, paid)
Due to the time required to retrieve data, I consider this only for disaster recovery on PC failure. For working cloud storage of working files see the Cloud Drive section below.
iDrive is an economical large cloud backup (5TB) with great performance, from a company that has been around for a long time. The SW GUI is a bit dated though it works well through command line scripts on Linux, connected to an online cloud interface. Through the online interface you can monitor and control backup settings and set up automatic scheduled incremental backups of local and USB drives for any number of PCs. Update: Although very cheap, lately I encountered some bugs with high CPU usage of their scripts and no longer recommend it. I switched to Duplicati + wasabi cloud, as per above.
Home files Incremental Backup (using Duplicacy + your cloud provider)
Due to the time required to retrieve data, I consider this only for disaster recovery on PC failure. For working cloud storage of working files see the Cloud Drive section below.
Duplicacy CLI (User HOME files to Google Drive etc incremental encrypted online backup with version history).
- Install: Using Go, by running:
go get -u github.com/gilbertchen/duplicacy/... - Initialise backup by running within the folder to back up for example google drive:
duplicacy init -e vijay-nuc8-hades_home gcd://nuc8-hades/home/- To save authentication, put token in
~/.duplicacy/and run:duplicacy set -key gcd_token -value .duplicacy/gcd-token.json
- Quick usage once initially set up:
duplicacy backup(Run the backup for current folder)duplicacy prune -keep 0:180(Delete previous versions of backup older than 180 days)duplicacy list(list revisions and dates of backups)duplicacy restore -r 4(rollback local files to revision 4)duplicacy restore -r 7 "Documents/Sampledata.xlsx"(rollback/restore a specific file from revision 7)
- You can also restore specific files only using the
.duplicacy/filtersfile. - Download/restore all files in a revision into folder
downloadall:mkdir -p downloadallcd downloadallduplicacy init vijay-dell-5290_home gcd://vijay-dell-5290/home/(init local repo)duplicacy list(figure out which revision you want)duplicacy restore -r 10(restore revision 10) - Reference:
- More guides:
System Restore
Timeshift (System files backup to local disk)
- Easy GUI tool for local “system restore” type functionality only, uses rsync for backend
- Incremental snapshots of system files, including GRUB bootloader
- User files are NOT included (
/homeand/root) - Need decent local disk space, or external HDD or NAS.
- Suggest keeping last 2 weekly snapshots, and 1 monthly snapshot
Cloud Drive
Gnome and KDE Dolphin built-in Google Drive integration This works exceptionally well for a cloud drive integration very tightly in the OS. Better than Googles own tools (which arent even available for Linux) which are still buggy and a massive resource hog.
- For Gnome you just need to add your Google account (under Online Accounts in settings) and your drive automotically shows up in the file browser (mounts as a network drive after clicking on it first time), along with your calender.
- For KDE you just need the kio-gdrive add on and login under Accounts in system settings. It works slightly differently as it treats Google docs files as Open Office docs. In practice this always work fine for me so far for viewing and quick edits, I can edit a document in Open Office and save it (it convert back to Google doc on save), but a word of caution in case i messes with your google docs, or you make a lot of changes and it doesnt save! For heavy editing I always open it in Google docs.
Settings Sync
The basic idea is to symlink all of your config files into one folder (such as ~/.dotfiles/) and sync that to an online storage or git repo, and easily sync between many PCs.
You can do it manually or there are several options to automate this:
-
DotBot ⭐ which requires manual configuration (yaml file) but gives greater control and the option to add any application. I prefer this due to its flexibility. I personally use this on all my PCs and server
-
Mackup
brew install mackupwhich is user-friendly and will autodetect configs to backup but is very simple and only supports specific apps.
Other potential tools
- Simple local
rsyncbased file-copy snapshots. For example I use this to back up my mobile USB drive, simply plug it into my home NAS then rsync the drive to the NAS RAID drive which is automatically backed up to cloud every night via Duplicati. - Free File Sync - Great for local backups, a GUI alternative to rsync.
- GoodSync CLI - (GUI version is Windows/Mac only) Paid. Similar to rsync but has connectivity to many cloud providers.
- Back In Time
Backup Tools that are not good or too buggy
- ODrive
- Backups using the built in Gnome backup tool (Deja Dup)
- inSync (Slow, high CPU usage, not good with lots of files)
What to backup:
- Users Home folder (or entire /home for all users), EXCLUDING:
- -.cache/
- -.logs/
- -.wine/
- -.wine32/
- -.PlayOnLinux/
- -.minikube/
- -.steam/
- -.config/google-chrome/
- -.gradle/
- -.dbus/
- -.debug/
- -.gvfs/
- -.local/share/gvfs-metadata/
- -.local/share/Trash/
- -go/bin/
- -go/pkg/
- -Downloads/
- -Insync/
- -TEMP_not_backed/
- Possibly manually installed system-wide programs:
- /opt/
- Other potential system configs and created files:
- /etc
- /root
- /srv
- /usr (/usr/local only, maybe /usr/share but nothing else)
- /var (except /var/run, /var/cache, /var/tmp)
- https://askubuntu.com/questions/222326/which-folders-to-include-in-backup
Disk Image Whole PC backup (partitions restore)
Options:
-
dd if=/dev/sda of=/dev/sdb bs=32M -
Clonezilla Live (or DRBL live CD recommended)
Save and restore all apps on new PC
First copy configurations (dotfiles) from the old PC Home directory to the new one.
Then create a list of all installed packages. Use apt-clone (sudo apt-get install apt-clone). ALL packages will be included in the list including all sources. Some apps which were installed through other means (not a source url) will be listed in the console. Unclear if snap packages are included.
On old PC:
sudo apt-clone clone foo #This creates foo.apt-clone.tar.gz
On new PC:
sudo apt-clone restore foo.apt-clone.tar.gz
Another option is Aptik (originally FOSS, now paid)
Bitlocker and disk Encryption
- USB drives:
- Use cross-platform FOSS: Veracrypt⭐
- Linux OS drive:
- LUKS is default method for “full” encryption which has better performance and security. NOTE: It can ONLY be done while freshly installing Linux. You can also unlock your drive by inserting a USB drive with a key on it.
- eCryptfs is another option which can be used to only encrypt the user’s home directory (and conveniently auto-decrypt when logging in using password). This can be done at any time after install. There is a bigger performance hit vs LUKS.
- Could try Veracrypt but its more complicated.
- Bitlocker can still be used for Windows partition on dual-boot systems. You may need to wrestle with Secure Boot bios setting if you rely on a TPM. However it is not possible to easily read Bitlocker drives in Linux.
- Encrypt a local file/folder using PGP:
- Make sure you have at least one PGP key on the PC (seahorse)
sudo apt-get install seahorse-nautilus- Right click on file file/folder and click Encrypt...
Create an encrypted USB Drive
Using Veracrypt (cross platform):
Veracrypt is very easy and cross platform but it has slower performance than Linux native solutions like LUKS.
Using LUKS (Linux only):
https://geekyshacklebolt.wordpress.com/2019/03/06/how-to-encrypt-usb-drives-with-luks/
LUKS is designed for Linux and not very cross platform. The great thing about LUKS is that it is fast and supports multiple passwords and keyfiles to unlock a single drive. Use sudo cryptsetup to open (i.e. decrypt) an encrypted volume, create encrypted partitions, modify settings and add/view decryption methods for a device.
Automount encrypted drive (on a headless server)
If you want to auto decrypt the drive on boot, try using crypttab with a keyfile, (similar to using fstab for auto-mounting non-encrypted volumes on boot). Technically it only decrypts drives on boot and not when USB inserted while running, see commands below to remount. A potential avenue to automount on insertion would be to use Hook Script with usbmount which detects the inserted device and runs a decrypt/remount script.
Add to /etc/crypttab:
tdrive UUID=e3a643ce-68c2-1dd2-521d-825400ba4872 /root/keyfile luks
(Get the UUID for the drive by checking symlinks in /dev/disk/by-uuid/) This will auto open/decrypt the volume based on the supplied keyfile and map it to /dev/mapper/tdrive. It is the same as running sudo cryptsetup luksOpen.
Add to /etc/fstab:
/dev/mapper/tdrive /media/tdrive ext4 defaults 0 0
When you reboot with the drive plugged in, it will automatically decrypt and mount by parsing crypttab then fstab. To remount by manually parsing both tab files at any time:
sudo cryptdisks_start tdrive
sudo mount -a
If you are looking for a GUI and/or CLI to easy manage mounting and encrypted mounts of any format (including Veracrypt, LUKS and even Bitlocker), try ZuluCrypt
Password saving and secrets
Use BitWarden⭐.
SSH Keys for logging in to services or servers
Many services such as Git repos, FTP, SSH remote terminal, and IOT devices, it is recommended to use SSH keys to authenticate instead of passwords. It’s certainly a better solution than saving passwords as cleartext files (default for some Git implementations).
- The best practice is to have per client machine SSH keys that can easily be revoked by logging into the server with a strong password if required.
- Each SSH key comes in a pair: private key and public key.
- They are usually installed in the
~/.sshdirectory. - The private key is secret and kept on the client.
- The public key can be sent to the server you want to authenticate with (i.e. log into).
- For web apps (e.g. Github, Bitbucket) simply log into the site, go to account settings and add your ssh public key.
- For SSH login to a headless server, either run on client
ssh-copy-id {username}@{remote_host}or append your public key to~/.ssh/authorized_keysfile. - Once set up, you no longer need a password to connect.
- For Git, you need to switch to SSH style logins (change all your remote URLs in your local repos
.git/configto SSH style URL) - SSH key pairs can be generated on the client with various algorithms (RSA, ED, EC) and bit length (the more the better, 2048 or more is great).
- You don’t necessarily need to back up the private keys, they are seen as disposable and revocable, like a browser cookie or login token. Though they can be included in a secure regular backup of the users home folder, to avoid redoing it after erasing a PC.
- The “Passwords and Keys” app built into Ubuntu can be used to generate and manage both keys and passwords. You can also generate a key pair using:
ssh-keygen -t rsa -b 4096 - You can optionally protect your private keys with a passphrase. That would mean they would need to be “unlocked” with the passphrase every time they need to be used (unless you are running SSH agent software that stores the decrypted key). If you store the private key only on an encrypted drive and it never moves, you are ok without a passphrase.
Passwordless sudo using U2F (e.g. Yubikey)
Set up Yubikey for Passwordless Sudo Authentication - DEV Community 👩💻👨💻
Passwordless Ubuntu Login using U2F
Passwordless login with Yubikey 5 NFC - Ask Ubuntu
Basically this creates the file common-u2f file which has the auth sufficient .. line (this can be changed to auth required .. if you want to use U2F as a second factor instead), then looks for the line @include common-auth in all the files under /etc/pam.d folder and adds @include common-u2f before that to enable passwordless auth. Note there may still be some apps in Ubuntu which are missed, for example the GNOME keyring, so you might still need the password for those. Or you could try this workaround for GNOME keyring.
To uninstall passwordless login, just search and remove the @include common-u2f from files under /etc/pam.d.
Software Development
Manage your config files (dotfiles) using dotbot and Git
DotBot ⭐
Maths and Statistical programming
Learn git properly
Watch this Then play this game
Install npm, node and typescript
Bash shell:
curl -o- https://raw.githubusercontent.com/nvm-sh/nvm/v0.38.0/install.sh | bash
nvm install node
Fish shell:
omf install bass
omf install nvm
nvm install node
Updating:
Latest current version: nvm install
Latest LTS version: nvm install --lts
Use specific version: nvm use --lts or nvm use 14 etc
Switch default version: nvm alias default --lts or nvm alias default 14 etc
node-typescript:
There is no more node-typescript (deprecated cli tool as part of original nodejs, for converting .ts code to .js). This functionality is now built into node (e.g. node main.ts main.js). If you have a tool which requires it, just create the alias: alias node-typescript=node
VS Code Recommendations
Install right-click context menu open for Nautilus
Good extensions:
- Tabnine
- cht.sh (and vscode-snippet extension bound to hotkey)
- Git Graph
- Git Lens
- Markdown All in One
Install Julia
The best way I found was to use the Jill tool to install system-wide, as the package manager versions are old, and the manual install is very... manual. Jill also allows installation and management of multiple versions of Julia under the julias installation directory
sudo pip install jill
sudo jill install
For notebook support (recommended), use Pluto.jl
You may also want to install the VS Code extension julia-vscode (the older Atom IDE is now discontinued).
Pimp your dev setup
Also see the 3. Terminal chapter of this book.
-
One developers f-ing awsome dev setup to get some ideas.
-
More inspiration.
-
Some more
-
For great monospace fonts for terminal and code, recommend one of the Nerd Fonts which are various popular coding fonts patch to include many additional icons and features:
- Hack⭐
- FiraCode
-
Looking for mouse-less efficiency or better management of large/multiple displays: see Tiling Window Managers (TWM)
Compile your own Kernel
Why?
- Learn to compile a kernel
- Customize the kernel for your machine by removing un-needed features, drivers and modules (especially if your device has limited space)
- Modify it to support new hardware or features
- Apply 3rd party code patches for new hardware or features that are not available as modules yet.
The main idea is:
- Install dependencies
sudo apt-get install git fakeroot build-essential ncurses-dev xz-utils libssl-dev bc flex libelf-dev bison gcc - Get the Kernel code:
git clonethe kernel code you want to build - In the cloned folder:
make menuconfigto configure the kernel features and save as.configfile. - Run
makecommand with parameters: number of cores to use during build (e.g. 16), build a .deb package for easy install/uninstall and suffix with-customso you can identify it easilymake -j16 deb-pkg LOCALVERSION=-custom - Wait some time (Took 18 minutes on my 8 core 16 thread AMD laptop. On some devices it can take hours)
- Install both resulting
linux-headers-...andlinux-image-...deb files, which will be placed outside the git project folder.
Docker for developers
Docker runs natively on Linux so there is no need for "Docker Desktop" which is essentially a user-friendly VM manager for developers on non-Linux OS (hence required on Windows and Mac).
Simply Install Docker Engine (CE) for development. Here is a good way to do it, which also installs Portainer⭐, a helpful web based GUI. This will also enable docker to run automatically as a background service.
After installing Docker Engine CE + Portainer, you would want to add your user to docker group permissions (so you dont have to do sudo docker all the time), and install docker-compose:
sudo groupadd docker
sudo usermod -aG docker $USER
Then reboot your PC and try docker ps which should no loneger require sudo
Then install docker-compose. Or a simpler way on Ubuntu is just run: sudo pip install docker-compose
Gaming
Disclosure: I don't really play video games so my apologies that this is probably the briefest and least helpful section of them all.
Microsoft Windows has had the monopoly on PC gaming for decades but this is starting to change. With Apple Macs becoming ever popular, and the push from Steam to support Linux gaming, non-Windows platforms are now viable.
Surprisingly, most games on Steam work fine in Linux. This is due to a push by Valve, who had ambitions to make their own gaming console, based on Linux. Valve also created the Proton compatibility layer for running some Windows games on Linux, by installing the game in Steam or importing the game into it. You can take a look at ProtonDB for more information and compatible games.
If you have the right hardware, gaming in a Windows VM with GPU pass-through within Linux is about as close to a perfect solution as you can get without dual-booting into Windows. Setting up a pass-through VM for gaming is beyond the scope of this document but you can find a growing number of tutorials and users online who can help.
Another gaming platform to try is Lutris. It is still beta quality but it aims to simplify Linux gaming, including the process to run games through Wine.
Cool Stuff you can do
This section covers random cool things you can do relating to hardware devices which you may not have thought of. These may just help you further appreciate the value of open source in terms of removing limits of what your PC can really do.
Stream audio to any DLNA device
sudo apt install pulseaudio-dlna\
pulseaudio-dlna
DLNA devices detected on the network will show up as additional audio sinks. Select the DLNA device you want to stream to as a sink from Pulseaudio Volume Control.
Show battery percentage of bluetooth headset
For some reason this might not work out of the box. You can check if you find your device power status in Gnome by going to Settings > Power > Devices, or run upower -d.
To get it to work, try:
- Edit the file for bluetooth service (could be different on your system)
sudo nano /etc/systemd/system/bluetooth.target.wants/bluetooth.service
- Edit the command that starts the service, and append
--experimentaloption
...
ExecStart=/usr/lib/bluetooth/bluetoothd --experimental
...
- Restart bluetooth service:
systemctl daemon-reload
systemctl restart bluetooth
- Run
upower -dto check if your device now shows up, or check under Settings > Power > Devices in Gnome.
Logitech Unifying Receiver
The Logitech website claims their Unifying Software does not work on Linux, which is true, but what they don't tell you is that there is a well maintained open source project called Solaar which is superior to their own software, that does work on Linux. sudo apt install solaar
Logitech and Steelseries Mouse (button remap and RGB)
https://github.com/libratbag/piper
Corsair Keyboard driver
Similarly, there is an open source RGB keyboard driver for Corsair. https://github.com/ckb-next/ckb-next/
Software Control of NUC8i7 Hades Canyon LEDs
https://github.com/nomego/intel_nuc_led
Software Control of Mipow Playbulb Candle (BLE)
https://github.com/Heckie75/Mipow-Playbulb-BTL201
Software Control of monitor OSD hardware brightness/settings (via DDC)
https://github.com/ddccontrol/debian-ddccontrol OR for a simple Notification icon (recommended): https://extensions.gnome.org/extension/2645/brightness-control-using-ddcutil/
You need to first install ddcutil AND enable i2c user group (https://lexruee.ch/setting-i2c-permissions-for-non-root-users.html). Also the last instruction in that link says to use su command to access root... doesn't work for Ubuntu so use sudo -s instead
Run something when a hardware device is inserted or removed
For example when a specific USB device with a vendor/hardware ID is plugged or unplugged, or when power is plugged or unplugged.
I use it to set my GPU on max speed when plugged in or min speed when on battery.
In the /etc/udev/rules.d/ directory you can create your own rules files such as 60-intel_gpu_frequency.rules:
# Rule for when switching to battery (default GPU)
SUBSYSTEM=="power_supply",ENV{POWER_SUPPLY_ONLINE}=="0",RUN+="/usr/bin/intel_gpu_frequency -d"

# Rule for when switching to powersupply (max GPU)
SUBSYSTEM=="power_supply",ENV{POWER_SUPPLY_ONLINE}=="1",RUN+="/usr/bin/intel_gpu_frequency -m"
You can also monitor udev for changes, to help you decide what variable or subsystem to use as a trigger:
udevadm monitor --environment
Format a drive/SD, modify partitions or backup whole drive image
Easiest way to change partitions or format is to use the GUI utility built into Ubuntu called Disks (or KDE Partition Manager in Kubuntu).
For advanced functionality use GParted or for terminal use fdisk.
Get Special Keyboard keys to work
Test the key but running acpi_listen and press the key and check whether anything is output.
https://www.suyogjadhav.com/misc/2021/06/15/How-to-get-the-Asus-mic-key-working-in-Linux-on-Zephyrus-G14-(2021)/
Use your smartphone as a wired or wireless webcam
- Install the DroidCam mobile app from Google Playstore or Apple store (or the paid version DroidCamX for more features).
- Install droidcam software on your PC.
- Run Wireless (PC and phone must be on same LAN or hotspot):
- Run
droidcamon PC and start DroidCam app on phone - Connect droidcam on PC to app using IP address, now you can use the webcam within any PC app.
- Run
- OR Run Wired (USB cable)
- Make sure USB debugging is enabled on phone (Settings > About > Version info, Tap build number until developer mode is enabled, then go to Settings > Developer and enable USB debugging)
- Add yourself to group:
sudo usermod -aG plugdev $LOGNAME - Add permissions for adb (avoid requiring sudo adb):
sudo nano /etc/udev/rules.d/51-android.rules- Add
SUBSYSTEM=="usb", ATTR{idVendor}=="04e8", ATTR{idProduct}=="6860", MODE="0600", OWNER="username"where username is your user name and runlsusb | grep -i samsungfor your phone brand (mine being samsung) to find correct values fromID idVendor:idProduct - Save an re-login
- Now plug in phone to USB, run
adb devicesand you should see your device show up (should not say "unknown" or a blank list). - Run
droidcamon PC and start DroidCam app on phone, and connect using USB option - Optionally change to 720p resolution as per instructions on DroidCam site for Linux (run command in Bash, or change single quote to brackets in Fish)
Tips to avoid bugs, breaking and issues
- USE STABLE LTS software where possible. This may limit some features but is highly likely to give you a smooth experience.
- ALWAYS BACKUP your important data (at least users home folder). Use seamless/automatic cloud services where possible. Do a manual whole PC backup if making scary system changes like resizing partitions.
- Prefer software that has been UPDATED RECENTLY, and at the same time MATURE (has a large user base with feedback to developers and has plenty of development/testing time). Having said that, a lot of simpler old software that hasn’t been updated for a decade and doesn’t have a modern replacement can sometimes still work well (hence nobody bothered to make a modern replacement).
- BE MINIMAL in customization and tweaks. With it's infinite customizability, it's easy to go overboard on Linux. Try not to get too nerdy and perfectionist when it's not absolutely necessary.
- SOME MAINTENANCE may be required on your part occasionally. This could mean checking for new forks of, or alternatives to, newly unmaintained software are available. Some software may require manual updates.
Troubleshooting programs in general
- Check if its latest supported build for your Linux version. If not, try an older or newer one.
- Run the program with sudo.
- Run the program from a terminal and check any log output
- Check system Logs for any errors or warnings
- Check for correct dependencies (e.g. Python version) and the correct version of those dependencies
- Check permissions for program (especially Snap or other sandboxed applications)
- Try a different install method (e.g. Snap, Flatpak), as they may bundle correct dependencies, have newer versions or offer more appropriate sandboxing.
- Try to figure out what type of app it is (e.g. Python 2, Python 3, Qt, Qt Quick, GTK 2/3, java, Go) and check if other apps of the same type have similar issues on your system. You could check the docs, forums, or source code to find out. This will give you clues about what to search in order to find a solution.
Killing unresponsive processes, and how it differs from Windows
- Terminal interactive GUI:
htopwhich includes mouse support
- Terminal manual commands:
- Find process using
psortop kill {pid}to kill a specific instancekillall {name}to kill all processes with this name
- Find process using
- Desktop GUI:
- Use the System Monitor app
- In KDE press
Ctrl + Escto quickly bring up a list of apps which you can terminate. - You can also press
Ctrl + Alt + Escto bring up the window termination tool where you can click on any window to kill it.
- If Desktop GUI (X11) is completely frozen
- Wait for a while to see if it recovers. If not, try
Ctrl + Alt + F2to go to a pure shell.
- Wait for a while to see if it recovers. If not, try
- About Un-killable processes:
- If a process is in the D State (uninteruptable state/sleep or disk sleep) it can't be killed except by restartng your PC.
- Usually a process in this state is waiting for I/O in the kernel and cannot be terminated.
Restart Gnome shell (GUI)
Simple method (if GUI responsive or you just installed something new):
- Press
ALT + F2 - Type
r - Press Enter
Other methods:
- Press
Ctrl+Alt+F2to switch to terminal and log in - Type
DISPLAY=:0 gnome-shell -r & - Type
exitand pressAlt+F1to switch back to GUI.
Restart KDE shell (GUI)
- Open a terminal or if GUI is broken press
Ctrl+Alt+F2and log in kquitapp5 plasmashell && kstart5 plasmashell- Type
exitand pressCtrl+Alt+F1to go back to GUI if required
Restart display manager
sudo systemctl restart display-manager
See more here
Distribution Upgrade
This is an upgrade going to a new major version. It is generally safe and takes around 30min to download and install.
Important considerations:
- Backup all data in the home folder at least.
- Ensure all packages are up to date.
- You cannot roll back the update.
- Usually all custom repositories will be disabled during upgrade which you can later re-enable.
- Some packages may be removed, it will tell you which before proceeding.
- Some packages and settings will break, particularly Gnome extensions and themes or icons. You can go to the Gnome extensions web interface and update/reinstall them, or find updated versions (often manually installed from the git repo).
- If you dual boot Windows with Bitlocker, have your Bitlocker recovery key handy as you might need it next time you boot Windows.
Software issues and quirks
Middle mouse button pastes (and selecting text copies)
This can be a very annoying (and embarrasing) "feature" which has been built into X11 for a long time and cannot be disabled. It can be partially disabled in many Gnome apps using a setting in Gnome Tweak Tool, but otherwise if you want it globally disabled, you need to use a workaround. The simplist is to install XMousePasteBlock, then add xmousepasteblock to your Startup Applications.
System Time is different on Windows vs Linux on a dual boot PC
Windows sets the hardware real-time clock (RTC) as local time instead of other OS which set RTC time as UTC then convert it to local time in software. Hence every time you go back and forth between OS, it changes.
To force Linux to set RTC time as local instead of UTC, you can run this command:
timedatectl set-local-rtc 1 --adjust-system-clock
Run timedatectl again to check settings. Run the same command replacing the 1 with 0 to undo the setting.
Some Qt based GUI apps look ugly/different, not using OS theme:
Using Qt5 Configuration Tool to apply the theme you want:
-
sudo apt install qt5ct
-
sudo nano /etc/environment and add the following line:
QT_QPA_PLATFORMTHEME=qt5ct -
Restart the system
-
Now open the Qt5 Configuration Tool and choose a gtk2 or another theme
Unfortunately this can cause issues when using a dark theme with some apps that override text colors as you end up with black text on a dark background. In this case you can force those apps to specifically use a light theme by running with -style Fusion
Some text in Qt apps too looks small/big/misaligned ugly
Noticed this issue in Kdenlive running on a 4K display in Kubuntu. It appears to be an issue with segments of the applications built using Qt Quick, when the DE global screen scaling setting is non-integer (e.g. 1.5 or 150%). Also noticed a mouse-over alignment issue with Emoji Picker in KDE.
A workaround is to run the app forcing the scaling to an integer value using an environment variable:
QT_SCREEN_SCALE_FACTORS=1 kdenlive
You can also try other variables to get the look you want.
Resize Linux or Windows partition to re-arrange space
- You need a bootable USB drive with gparted on it and preferably also Clonezilla to do a full disk backup onto an external USB drive. I use a USB stick with DRBL which includes everything required.
- If you have Bitlocker encryption on the Windows parition, you must first log into Windows and disable it, then wait for the drive to decrypt before preceeding with resize.
- If you have Secure Boot enabled in your BIOS, you will likely need to disable that as well in order to boot from a USB drive.
- WARNING: risk of data loss! Backup everything. Highly recommend doing a full-disk backup onto an external USB using Clonezilla FIRST
- If you need to resize a LUKS partition after upgrading to a larger SSD, see here.
- It might take a very long time to resize. On a very fast nvme drive it took about 12 minutes to resize a 250GB partition, but slower PCs or larger drives could take hours.
- If your PC fails to boot after resize, DONT PANIC. This often happens with older systems as the OS partition moved and bootloader cant find it. The solution is usually to reinstall GRUB bootloader on the /boot partition (and /boot/efi for modernUEFI boot). Check here for solutions. If your LUKS encrypted file system fails to boot, check here.
- When ready, follow the steps here to resize, beginning step 2 if you already have your own boot USB with gparted on it.
- If your PC suddenly boots very slowly after changes, see below.
Network (ethernet) doesnt work after upgrading hardware or motherboard (or swapping SSD to another PC)
First run ip a and lshw -C network to see if you can find your ethernet adapter (it might show up as DISABLED). If you dont find it at all, try upgrading your kernel if its older than your hardware.
If you do see it (usually starts with en...) and it is DISABLED, then edit your netplan configurations (which are files under /etc/netplan/*.yaml) to include it or rename the old en... from your previous hardware to the new one you found when running the lshw or ip command above.
Very basic working example for ethernet adapter called eno1, add your static IP, gateways etc here if required
network:
  version: 2
  ethernets:
    eno1:
      dhcp4: true
After adding your ethernet adapter to the netplan config, optionally test the settings out with sudo netplan try which will timeout after 120 seconds and revert to the previous if you dont press enter to accept the changes before then.
Once you are happy with it, run the following to apply the settings persistently:
sudo netplan --debug apply
sudo systemctl restart network-manager
Now if you run ip a you should see an ip address. If not, just reboot the PC and check your router for the device and check DHCP and ip reservation on the router if required.
If you are using Virtual Box, check the network adapters (Bridged or NAT) for your VMs to ensure they are using the correct network device.
Boot up is suddenly very slow (30-60 seconds)
This can happen after resizing/moving/copying disks or partitions or changing/deleting OS. Usually the culprit is a broken entry in the fstab file e.g. a disk UUID which no longer exists or changed.
sudo blkid #lists current IDs
sudo vi /etc/fstab
Then correct the fstab file based on what you see in blkid. If you still have issues you may need to re-install grub on that device.
Notification-area/Tray icon not showing up for an app you installed in Ubuntu
For example Skype and XPad may have this issue as they use an older API for showing the icons which Gnome has now dropped. To support legacy icons, install the TopIcons extension.
HiDPi displays, high density display, retina display, fractional scaling support
So far Kubuntu (KDE) has the best support for high density displays scaling that I tested. Ubuntu Gnome also has good support since 20.04 but it may reduce performance or require a good GPU.
Nautilus (Gnome file manager) issues, restart file manager (equivalent of Windows explorer restart)
Usually fixes intermittent issues such as:
-
Mouse pointer stuck
-
File manager unresponsive
-
Drag and drop stops working
-
Desktop icons disappear
pkill nautilusBring back desktop:
nautilus-desktop &
disown
Another Nautilus issue that can arise is that it freezes when typing a letter in the search bar. This is usually caused by a problem with the search indexing service, and can also cause a constant high background CPU usage by a process called tracer-miner-fs-3. To fix this issue, restart the indexer by typing:
tracker3 reset -s
Python 2 applications not loading
Some older applications, which are not maintained, still use python 2 which has been discontinued in favour of Python 3. Look for more recent forks where a new maintainer may have taken over and updated it (e.g. PDF Shuffler > PDF Arranger). If there is no Python 3 option, try one of the following:
- If you have the script (.py) then run
python2 [script-filename] - If the app launcher is installed via script in some directory on your
PATH(e.g./usr/bin/) then run: which [name-of-launcher-bin](to get the full path to it)sudo nano [full-path-launcher-bin]- Edit the line near the top ("shebang" line) which looks like
#!/usr/bin/python, changing it to specify Python 2, e.g.#!/usr/bin/python2
Repeated “System program problem detected” prompt, often on login/boot
There may be system crash reports which are failing to send. Check the /var/crash/ directory and try deleting them all:
sudo rm /var/crash/*
App Armor
App Armor is a sandboxing method that protects the kernel and system from harmful programs or errors/bugs in programs. Various profiles are loaded for apps with different levels of access.
Install apparmor-extra-profiles and apparmor-utils for full usage.
More info.
Find files and Improve KDE/Dolphin file search
You may notice the file search in KDE file manager (Dolphin) shows file search results instantaneously, however it only looks in the users home folder and is missing hidden files and certain types of files. To improve this, you need to adjust settings of the Baloo file indexer which is running in the background by editing ~/.config/baloofilerc.
Options for a more complete/dynamic file search:
- KFind. Similar to Windows (install by clicking “More Search Tools” in Dolphin)
- FSearch. Similar to Everything Search Engine tool for Windows. Instant search with fast indexing and regex support. You will need to set up which folders it searches in first time you run it, and it could take a minute to build the initial database (or a few seconds on a NVMe SSD).
findbuilt in terminal commandfdorfdfindterminal command- fzf. The ultimate search tool for terminal (or in general).
- This tool searches through text not file systems, so you can feed it any file or output of a command, such as one of the above file search commands, in order to search through just about anything.
- To understand why it's so amazing, watch this great video.
- Search through files in current dir:
find | fzf - Search through files in home:
find ~ | fzf - Search contents of any text file:
cat ~/.bashrc | fzf - Search for a file then open it in vim:
vim $(find | fzf) - If you run
fzf, by default it will search through all non hidden files in current directory. - To change its default edit environment variable
FZF_DEFAULT_COMMAND
Hide Windows partition from Linux file manager
Find the name of the windows partition (something like /dev/sda1)
sudo fdisk -l
Edit this file:
sudo nano /etc/udev/rules.d/99-hide-partitions.rules
Add this line, replacing sda1 with name of Windows partition:
KERNEL=="sda1",ENV{UDISKS_IGNORE}="1"
Optionally, run this to refresh:
sudo udevadm trigger --verbose
Flatpak or Gnome/GTK apps dont match system theme (and monitor scaling) in KDE Plasma
Find and install theme using flatpak to match your OS theme (more info) e.g.
flatpak install flathub org.gtk.Gtk3theme.Breeze-Dark
Then go to System Settings > Application Style > Gnome/GTK Application Style and set the theme
Fix unreadable text issues in some apps (Foxit) in KDE dark theme
I startup a light KDE theme and system creates a ~/.kde with light configurations. Then I renamed this folder to ~/.kde-light and startup a KDE with dark theme and system create a new ~/.kde with dark configurations.
In file FoxitReader.desktop, I update the following line to use .kde-light folder:
Exec=KDEHOME=$HOME/.kde-light /home/user/programs/foxitreader/FoxitReader.sh %F
Use Windows/Meta key as a shortcut in KDE
It is disabled by default. Install and run ksuperkey to bind it to Alt+F1 which you can assign to any action as per normal. Also add ksuperkey to startup applications.
Stop Discover from showing up on login
Run the following to hide the application window when it starts (will still show in tray)
'Hidden=true' >> ~/.config/autostart/org.kde.discover.notifier.desktop
Hardware issues and quirks
Monitor does not turn back on after resume from sleep
If you have an NVIDIA graphics card, you might need to make a small change to grub. Or try some of the other solutions on that link. You may also find that blindly typing your password and hitting enter to unlock the PC might turn it back on.
You can also try this script to switch to TTY before and after suspend, although it is old and did not work for me.
What did finally work for me on Kubuntu and AMD discrete graphics + Intel embedded GPU (didnt have the issue on a laptop with Intel graphics only), was to enable BIOS setting for ACPI PCIe OS support.
Monitor turns back on again 5 seconds after going into power save (DPMS)
This could be due to a long standing issue relating to a conflict between gnome-power-manager and DPMS (display power management). There is discussion here.
However there are other causes as well. For me it was actually the Input Source Auto-select function on my Dell monitor that caused the monitor to wake back up again. I simply disabled this on the monitors OSD and it was fine after that. You can test whether it it specific to your laptop display or your monitor by seeing if it works find with one or the other disabled/disconnected.
Touchscreen on some devices isn’t perfect
UPDATE: actually works ok on Ubuntu 20.04 xwindows out of the box.
TIP: If you have a convertible tablet (e.g. Surface Pro) and you often use it with touch-only, make sure you start with an appropriate Desktop Environment. The best I have tried is Gnome 3.x (default Ubuntu) and I heard Deepin is also good. With Gnome you should add the accessibility settings to system tray which allows quickly toggling onscreen keyboard and large fonts, when you want "tablet mode"
For touch screen devices like Surface Pro, Wacom, Dell touch screen laptops, you may want to use Pinch zoom, drag and rotate documents/images smoothly using touch etc. By default this may not work in Ubuntu as it may be using the wrong driver which recognises touch as a mouse, not as touch events. Try below to fix it:
sudo nano /usr/share/X11/xorg.conf.d/70-wacom.conf
Find and remove the section below, then save and restart:
Section "InputClass"
Identifier "Wacom touchscreen class"
MatchProduct "Wacom|WACOM|PTK-540WL|ISD-V4"
MatchDevicePath "/dev/input/event*"
MatchIsTouchscreen "true"
Driver "wacom"
EndSection
If it still doesn’t work, try removing the USB section as well or instead.
Section "InputClass"
Identifier "Wacom USB touchscreen class"
MatchUSBID "056a:*"
MatchDevicePath "/dev/input/event*"
MatchIsTouchscreen "true"
Driver "wacom"
EndSection
https://askubuntu.com/questions/1102627/touchscreen-multitouch-works-in-xwayland-but-not-xorg
Some actions like pinch rotate and palm rejection in Krita are not as good as the Wayland, but dont bother with Wayland, too many bugs and compatibility issues. To get around lack of palm rejection just turn off touch and use pen input only. Most other apps should work ok. Google Chrome browser somehow works perfectly.
Once you remove the above, Ubuntu will default to the libinput driver which works OK.
/usr/share/X11/xorg.conf.d/40-libinput.conf
Using WiDi or miracast
Currently does not work but there are some potential avenues:
https://github.com/benzea/gnome-network-displays https://blogs.gnome.org/benzea/2019/01/30/gnome-screencast/ https://github.com/intel/wds
Webcams built into laptops
Many built in webcams using MIPI or other non-USB interfaces don’t seem to be fully supported, even though kernel support (MIPI CSI) is being worked on. In addition to kernel support they also need user software which controls them. However most Logitech and generic USB webcams supporting UVC will work fine without a driver.
I personally use a Logitech C930e USB webcam and Webcamoid software to control hardware settings such as zoom and pan. For a CLI settings tool which works even while the camera is running, try V4L2-CTL.
Alternatively, check out section 9. Cool Hardware Stuff of this document, for a way to use your smartphone as a wireless or wired webcam.
Slow copying of files to USB drive
I noticed this happening on automounted USB drive on a headless Ubuntu server, it was painfully slow for a USB Samsung T5 SSD. To fix it I used umount and mount commands to manually remount the drive while plugged in then used rsync and it was blazing fast. See more tips here.
Some Audio input devices functionality
Some complications you will run into with using audio input and output on Linux:
- Plugging a headset with MIC into a 4-pole 3.5mm headphone jack usually works for audio output but you might have issues with mic input. To fix the MIC issue try one of these:
- Add
options snd-hda-intel model=dell-headset-multito the bottom of your/etc/modprobe.d/alsa-base.conffile and reboot, then see if you can select "Headset Microphone" mode when you re-insert your 3.5mm jack headset. - OR try one of these solutions. Specifically install
alsa-tools-guiand runhdajackretaskthen find your sound card, leave all overrides un-ticked and press "Install boot override" and reboot PC.
- Add
- Bluetooth headsets with MIC usually work for high quality audio output but not simultaneous mic input for BT 4.0 devices and PCs. You might get bidirectional Bluetooth audio with a lower quality BT profile (i.e. mono telephone quality). In BT 5.0 devices this issue might be fixed (but requires both the device and PC to use BT 5.0).
- The current stable version of the pulseaudio driver only supports the most basic SBC codec for Bluetooth audio. If you want use a higher quality BT audio codec such as aptX or LDAC, you need to wait for the upcoming version of pulseaudio or install a 3rd party codec integration for your system (to remove this, uninstall the packages and reinstall the original pulseaudio-module-bluetooth).
- USB wired headsets or DACs with generic drivers tend to be the best option.
Printers, scanners and multifunction
Network printers and scanners, such as HP Officejet, work pretty well. USB printers and scanners not so much due to proprietary drivers and software.
Network Printer is detected but doesnt work, or has stopped working
This is fairly typical of autodetected networked printers and Windows seems to have the same issue. The best way to add a printer is to remove any autodetected printers and manually add the printer via its LAN IP address (first ensure the printer IP is static/reserved on your network). Linux uses CUPS to manage printers. To do this:
- Open http://localhost:631 in your web browser to configure CUPS server (your distro might provide a GUI tool to manage printers, but I suggest sticking to the web interface for consistency).
- Go to the Printers tab and delete the non-functional printer
- Go to Administration > Add Printer and wait until it finishes detecting your network
- You might see multiple copies of your network printer detected, you want to pick the one that gives you a
socket://{IP address}:9100type connection string after continue next page, so might take some trial and error. If you dont find it, try manually adding an AppSocket connection and enter yoursocket://{IP address}:9100connection. - On the next page, select your driver based on printer model. Again, may be some trial and error to see which driver works. I have an HP printer and the
hpcupsdrivers worked,driverlessdid not. - Print a test page, and if it works, set it as default. If not, try a different driver or connection.
Hibernate does not work
Hibernate function saves current RAM contents to disk and shuts down PC, and then restores everything when you power back on (passing through POST, GRUB etc). It is disabled by default due to potential bugs and data-loss due to hardware differences.
Run systemctl hibernate or pm-hibernate to see if you can hibernate.
If not, try below:
- First check whether you have Secure Boot enabled in your PCs UEFI Bios. If so, hibernation is not possible, as you cannot boot with anything but directly from a signed Kernel, as Ubuntu does not have a way to sign hibernation images. You can disable Secure Boot, which will not decrease security as long as all of your OS partitions are encrypted (e.g. LUKS or Windows Bitlocker).
- Next, re-enable hibernation.
- Ensure your RAM contents fit inside the free swapfile space before hibernating, by checking the System Monitor, OR just make your swapfile size 1.5x your RAM to be safe.
CPU Governer, throttling, fan spin-up/down, temperature idle/peak concerns
The driver for throttling CPU is built into the Linux kernel. You may notice the fan and/or CPU temperatures are somehow different to when you use Windows due to different ways the CPU throttling is handled. If you want some control or to monitor this, try one of these tray utilities which can also be set to set different CPU throttling modes based on battery vs plugged in:
- For Gnome: CPU Power Manager.
- For KDE: Intel P-state and CPUFreq Manager Widget
Adjusting GPU frequency
If you have a low power Intel GPU and you find the graphics in Ubuntu animation slightly choppy, try sudo apt install intel-gpu-tools and run sudo intel_gpu_frequency -g to see your current GPU frequency. You can force to higher frequency by running sudo intel_gpu_frequency -m and wait a few seconds and see if that helps. It may decrease battery life so run sudo intel_gpu_frequency -d to reset to defaults if running on battery.
Read this article for deeper explanation about GPU scaling.
Video Encoding/Decoding is slow or laggy or drops frames (e.g. slow OBS streaming, encoder failure)
You may need to enable hardware video encoding/decoding or install a driver which enables it. For example if FFMPEG VAAPI encoding fails in OBS, then most likely you are missing the right driver. I have an Intel UHD Graphics 620 GPU and I needed to install intel-medi-va-driver-non-free, which replaces the default installed intel-medi-va-driver, then reboot. The performance boost with video capture is massive.
sudo apt install intel-media-va-driver-non-free
Firefox video decoding (e.g. youtube) slow or CPU intensive
For whatever reason, GPU video acceleration is disabled by default in Ubuntu Firefox. To enable it, depending on your GPU, follow these instructions (or a more detailed version). You can benchmark CPU usage by playing an intensive video before and after the changes. To monitor GPU usage, depending on your GPU, try radeontop, nvtop, or intel_gpu_top. To monitor CPU usage: htop.
You probably also want to install additional non free codecs: sudo apt install ubuntu-restricted-extras
Force any app to run on dedicated GPU (NVIDIA)
Try running switcherooctl [app] e.g. switcherooctl kdenlive
Some apps run in graphic mode, others in Compute mode.
apt-get update shows warnings about trusted.gpg keyring being depricated
For example:
W: https://dl.winehq.org/wine-builds/ubuntu/dists/jammy/InRelease: Key is stored in legacy trusted.gpg keyring (/etc/apt/trusted.gpg), see the DEPRECATION section in apt-key(8) for details.
This is caused by running sudo apt-key add commands to store keys in /etc/apt/trusted.gpg which is now deprecated, so avoid this in future. Instead they should be stored in /etc/apt/trusted.gpg.d using
To move existing keys to the new suggested location:
-
Run
sudo apt-key listand note the keys listed under/etc/apt/trusted.gpg, then for each of those keys listed intrusted.gpg: runsudo apt-key del XXXXXXXXwhereXXXXXXXXis the last 8 characters of the key listed with thelistcommand. This will remove the existing keys fromtrusted.gpg. Now when you runsudo apt-key listagain, there should be nothing under/etc/apt/trusted.gpg. -
Now download and run this script. That should get the keys for all major trusted repositories.
-
Run
sudo apt updateagain and check for errors such asThe following signatures couldn't be verified because the public key is not available: NO_PUBKEY BE3E6EA534E8243FIf you see any, then for each one, take note of the last 16 characters of that line afterNO_PUBKEYand then do:-
Google the app name plus "public key file" and download it (e.g. a
.pub, or.asctext file usually containing-----BEGIN PGP PUBLIC KEY BLOCK-----on its first line). -
Run
gpg --dearmour [pub file name], replacing[pub file name]with the name of the file you downloaded above. This will give you a.gpgfile. -
Rename the
.gpgfile to[last 16 characters after NO_PUBKEY].gpg, using the 16 characters from the warning message in step 3 above. -
Copy the renamed
.gpgfile to/etc/apt/trusted.gpg.d(usesudo).
-
-
Now you should be able to run
sudo apt updatewithout errors.
Other warnings include N: Skipping acquire of configured file 'main/binary-i386/Packages' as repository 'http://packages.microsoft.com/repos/code stable InRelease' doesn't support architecture 'i386' which can be fixed by adding [arch=amd64] after deb in the either the /etc/apt/sources.list.d/ file or /etc/apt/sources.list.
Limits on file watchers, inotify limit reached
If you get errors about this, the app you are trying to run has passed the default limit of inotify (about 65k). The way to fix it is to increase the limit setting.
Headless Server
Bonus notes on running a headless server.
Also see Terminal Tips section of this doc
Firstly, always aim to do everything through ssh terminal. It is tempting to add a GUI but it is unnecessary and costs memory and CPU. Even many web GUIs are inefficient and limited. The closest thing to a power-user server GUI is use of a tiling terminal multiplexer with mouse support -> sudo apt install tmux
tmux
A great way to access headless servers through CLI. First SSH into the server and install and run tmux.
Quick start for beginners
Good tmux tips
tmux prefix = Ctrl + b
Recommended tmux setup:
ssh {server IP address}
sudo apt install tmux
Install tmux plugin manager using instructions here
https://jdhao.github.io/2019/01/17/tmux_plugin_management/#install-tpm-
This is my config file with some nice defaults and plugins ~/.tmux.conf
# List of plugins
set -g @plugin 'tmux-plugins/tpm'
set -g @plugin 'tmux-plugins/tmux-sensible'
# .... maybe more plugins here

set -g mouse on

# Plugins and settings for session saving
set -g @plugin 'tmux-plugins/tmux-resurrect'
set -g @plugin 'tmux-plugins/tmux-continuum'
set -g @continuum-restore 'on'
set -g @continuum-save-interval '10'

# By default these programs are restored. Add more below.
# vi vim nvim emacs man less more tail top htop irssi weechat mutt
set -g @resurrect-processes 'mc nano glances iftop'
set -g @resurrect-capture-pane-contents 'on'

# Initialize TMUX plugin manager (keep this line at the very bottom of tmux.conf)
run -b '~/.tmux/plugins/tpm/tpm'
Select/copy/paste text in tmux session: Hold shift + drag to do this, including Shift + middle-mouse to paste.
Session save and restore:
Default autosave every 15 mins. Save: prefix + Ctrl-s Restore: prefix + Ctrl-r
Midnight Commander (CLI GUI file browser)
sudo apt install mc
mc -x
(-x enables mouse support)
VM Virtual Box
Enabling VMs to launch automatically at boot Virtualbox CLI management basics Full vboxmanage CLI reference
VBoxManage list vms | View list of VMs |
VBoxManage showvminfo {vmname} | View VM info |
VBoxManage startvm {vmname} --type headless | Start VM |
VBoxManage controlvm {vmname} acpipowerbutton | Shutdown Safely |
Modify network settings
VBoxManage modifyvm {vmname} --bridgeadapter1 {adapter-name}
VBoxManage modifyvm {vmname} --macaddress1 {mac-without-:'s}
Download, insert and install guest additions:
sudo apt-get install virtualbox-guest-additions-iso
VBoxManage storageattach {vmname} --storagectl IDE --device 0 --port 1 --type dvddrive --medium /usr/share/virtualbox/VBoxGuestAdditions.iso
VBoxManage storageattach {vmname} --storagectl IDE --device 0 --port 1 --medium none
Installing with LUKS encryption and automatically unlocking on boot with keyfile
https://dradisframework.com/support/guides/customization/auto-unlock-luks-encrypted-drive.html
(Note this will render the encryption more or less useless!)
Adding a swap file (Server doesn’t have one by default)
https://linuxize.com/post/how-to-add-swap-space-on-ubuntu-18-04/
Transferring files between server
- FTP
- wormhole send
GUI CLI Docker
https://github.com/jesseduffield/lazydocker/blob/master/README.md
Advanced use of Git
https://learngitbranching.js.org/
What to back up
Nextcloud
https://github.com/nextcloud/nextcloud-snap/wiki/How-to-backup-your-instance
The best ways to install and deploy remote software
Canonical is pushing Snap, a package/deployment system which works well for both desktop and server apps. Dependencies are packaged together and run sandboxed via snapd, and directly share the system resources, peripherals, ip/network, including filesystem (as long as they are given the right permissions and read/write).
Manage Snap from CLI:
https://itsfoss.com/use-snap-packages-ubuntu-16-04/
Another popular alternative is Docker. Docker is a containerisation system which runs sandboxed apps and can be easily scaled to many instances dynamically based on load.
Change IP and DNS settings on command line:
Check settings:
systemd-resolve --status
Or equivalent: resolvectl
Change settings:
sudo nano /etc/netplan/00-installer-config.yaml
Add lines as described here
Run to refresh network settings and check:
sudo netplan apply

ip a
Remote GUI for Headless server
Many admins will discourage GUI use for servers, citing extra resource use and you can already do everything via the terminal if you bother to learn it.
If you have a server with average capability it can handle running a GUI just fine and personally I have come across a handful of situations where a GUI can really help out. One of these is administering a Virtual Box appliance hosted on the server.
The recommended GUI for a server is LXDE due to its low resource usage. It is very simple to install and enable for remote RDP access only. Here is a guide.
To connect remotely from another Ubuntu Desktop PC, you can use Remmina or similar. Once you have LXDE installed and setup, reboot the server and create an RDP connection to it an also enable SSH Tunnel in connection settings.